Exercise 4: Automate app deployment
In this exercise, we will use the TeamsFx to automate development workflow while building a custom Teams application.
Prerequisites
- A Microsoft 365 tenant
[!NOTE] Follow the instructions on Welcome to the Microsoft 365 Developer Program for obtaining a developer tenant if you don’t currently have a Microsoft 365 account. Make sure you have also enabled Microsoft Teams.
- A Microsoft 365 account without MFA
[!NOTE] Currently, a non-interactive authentication style for M365 is used in CI/CD workflows, so please ensure that your M365 account has sufficient privileges in your tenant and doesn’t have multi-factor authentication or other advanced security features enabled. Please refer to the Configure M365 Credentials to make sure you have disabled Multi-factor Authentication and Security Defaults for the credentials used in the workflow.
- An Azure subscription
[!NOTE] If you don’t currently have an Azure account, you can create a free Azure account.
- A test repository on Azure DevOps
[!NOTE] If you don’t currently have a test repository on Azure DevOps, you can create one for free, and make sure you have enabled scripts to run Git commands.
- Node.js - (v16.* is recommended or higher)
- Git
- Azure CLI
- TeamsFx CLI - (v1.* is recommended or higher)
-
Bicep - (v0.4 is recommended or higher)
- Visual Studio Code
Task 1: Add project source code to Azure DevOps
-
Create a new folder named CICDSample on your local machine.
-
Open a Command Prompt with Administrative privileges.
-
From the command line, change the directory to the CICDSample folder you created.
-
Execute the command below to clone your test repository to your local machine.
[Tips] Git URLs in Azure DevOps usually look like this: https://dev.azure.com/{organization}/{project}/_git/{repository} .
git clone https://dev.azure.com/{organization}/{project}/_git/{repository} -
If prompted, sign in with your Azure DevOps account in the Git Credential Manager.
-
From the Allfiles folder, copy everything in the Helpdesk-CICD folder to the ./CICDSample/{repository} folder.
-
From the command line, change the directory to the ./CICDSample/{repository}/ folder.
-
Execute the
npm installcommand to install the required packages. -
Execute the
teamsfx add cicdcommand to start the interactive command process.-
Select Azure DevOps as the CI/CD provider.
-
Select the templates below from these options: CI, CD, Provision, and Publish to Teams.
- CD
- Provision
- Publish to Teams
-
-
Open Visual Studio Code, then locate and open the ./.azure/pipelines/cd.dev.yml file.
-
Locate the statement
- main. -
Replace
mainwithmaster. -
Save the file and close Visual Studio Code.
-
Execute the commands below to commit and push your project source code to the Azure DevOps remote repository, including the CI/CD yml files.
[!NOTE] Before you can issue a commit in Git, the
user.nameanduser.emailproperties must be set. If not, please execute the commands below:
git config --global user.email "you@example.com"
git config --global user.name "Your Name"git add . git commit -a -m "init" git push --force origin master git branch --set-upstream-to=origin/master
Task 2: Create Azure Service Principals
To provision and deploy resources targeting Azure inside CI/CD, you must create an Azure service principal for use.
-
From the command line, execute the command below to log in to the tenant where you want to provision cloud resources.
az login --tenant <tenantId> -
Execute the command below to create an Azure service principal.
az ad sp create-for-rbac --name myCICDServicePrincipal --role Contributor --scopes /subscriptions/<subscriptionId> -
After the Azure service principal is created successfully, copy the tenant (AZURE_TENANT_ID), appId (AZURE_SERVICE_PRINCIPAL_NAME) and the password (AZURE_SERVICE_PRINCIPAL_PASSWORD) from the output to a text file. You will need these values later.
Task 3: Create Azure DevOps Pipeline
-
Open a browser and navigate to Azure DevOps, and select your test project.
-
In the left sidebar, select Pipelines.
-
Depending on your environment, select Create Pipeline or New Pipeline.
-
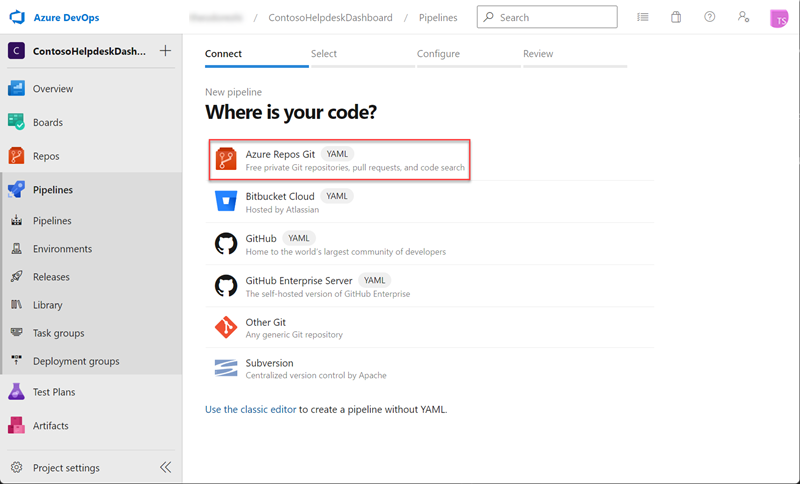
In the Where is your code? tab, select Azure Repos Git.
-
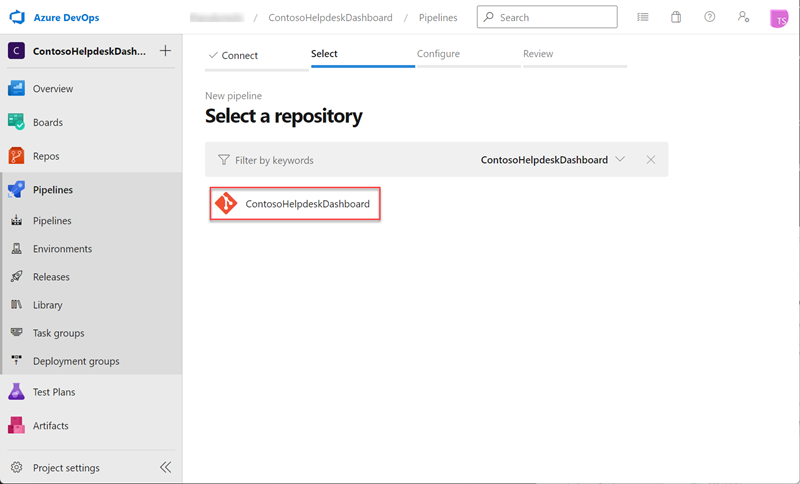
Select <your test repository>.
-
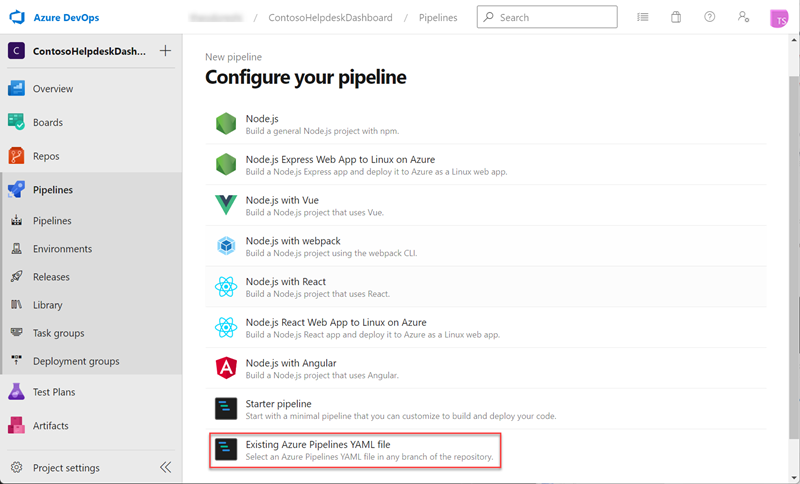
In the Configure your pipeline tab, select Existing Azure Pipelines YAML file.
-
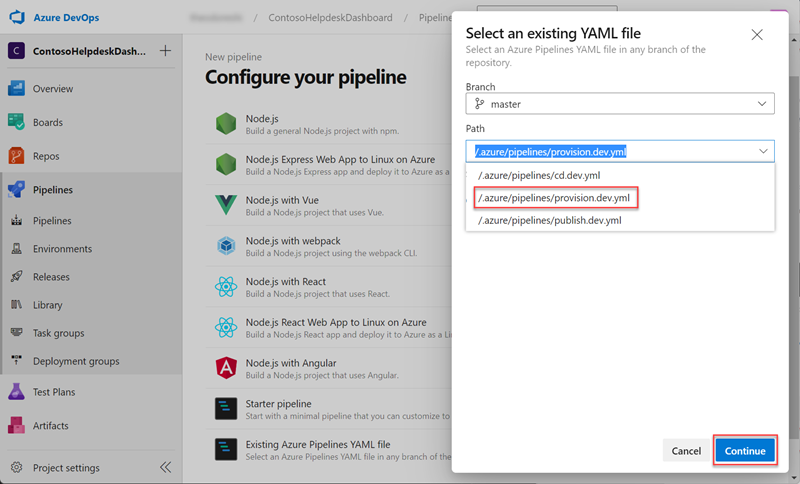
In the Select an existing YAML file panel on the right, select /.azure/pipelines/provision.dev.yml, and select Continue.
-
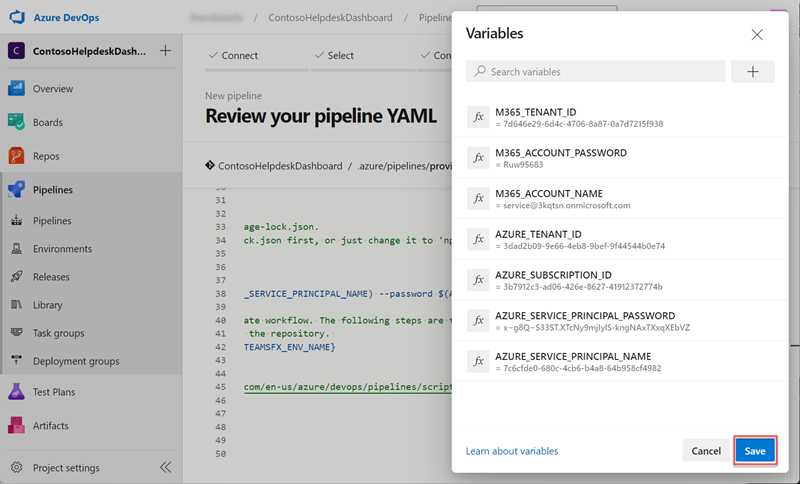
Select Variables > New variable to create the variables below and enter the corresponding values. After configuring all the variables, select Save to close the panel.
[!NOTE] A non-interactive authentication style for M365 is used in CI/CD workflows, so please ensure that your M365 account has sufficient privileges in your tenant and doesn’t have multi-factor authentication or other advanced security features enabled.
- M365_ACCOUNT_NAME
- M365_ACCOUNT_PASSWORD
- M365_TENANT_ID
- AZURE_SERVICE_PRINCIPAL_NAME
- AZURE_SERVICE_PRINCIPAL_PASSWORD
- AZURE_SUBSCRIPTION_ID
- AZURE_TENANT_ID
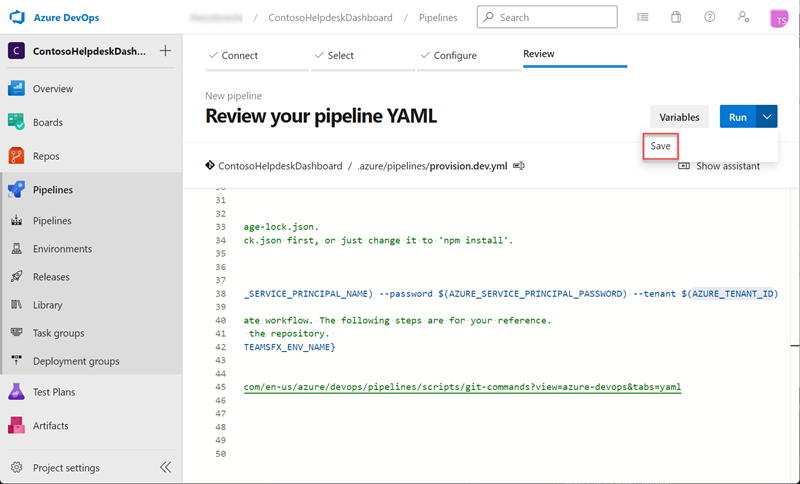
-
Select the down arrow icon to the right of the Run button and select Save to create the pipeline.
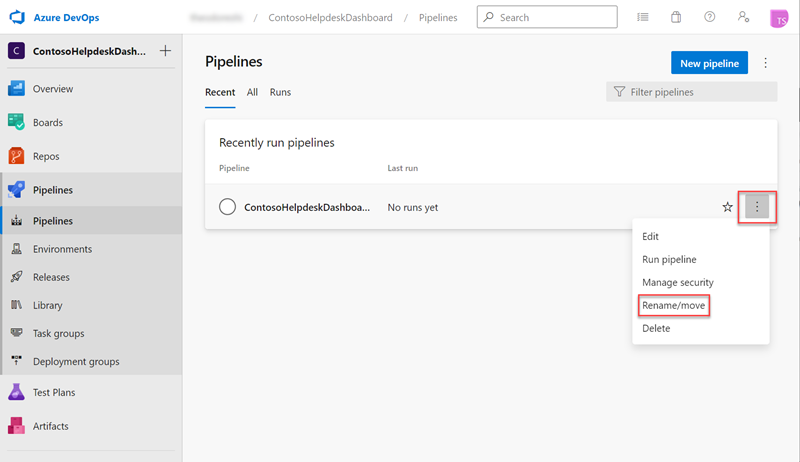
-
Select the more options icon > Rename/move to rename the pipeline to a friendly name, e.g. helpdesk-provision.
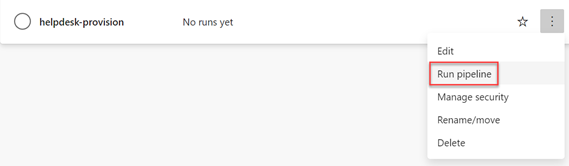
-
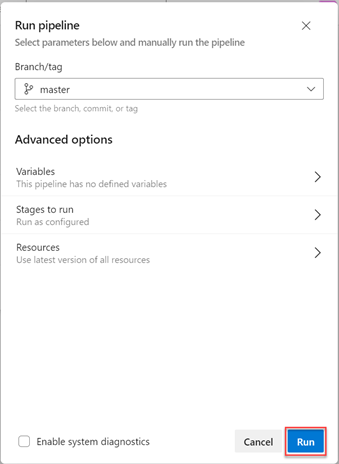
For helpdesk-provision pipeline, select more options icon > Run Pipeline.
[!NOTE] Make sure you have enabled scripts to run Git commands.
-
Select Run to manually trigger this pipeline, and wait for it to finish executing.
-
Repeat the above steps for importing to import the /.azure/pipelines/cd.dev.yml pipeline, and add the variables below to the pipeline. Then, rename the pipeline to a friendly name, e.g. helpdesk-cd.
- AZURE_SERVICE_PRINCIPAL_NAME
- AZURE_SERVICE_PRINCIPAL_PASSWORD
- AZURE_TENANT_ID
-
Trigger the helpdesk-cd pipeline manually and wait for it to finish executing.
-
Repeat the above steps for importing to import /.azure/pipelines/publish.dev.yml pipeline, and add the variables below to the pipeline. Then, rename the pipeline to a friendly name, e.g. helpdesk-publish.
- M365_ACCOUNT_NAME
- M365_ACCOUNT_PASSWORD
- M365_TENANT_ID
-
Trigger the helpdesk-publish pipeline manually and wait for it to finish executing.
Task 4: Test App Automated Deployment
-
Open a browser and navigate to the Microsoft Teams admin center. Sign in using a Work or School Account that is a Global Admin or Teams Service Admin.
-
In apps table, click the Publishing status column header to sort. Then, click the Teams App you published through helpdesk-publish pipeline.

-
Select Publish to approve the Teams app.
-
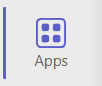
Open a new tab in your browser, navigate to Microsoft Teams and select Apps in left sidebar.
-
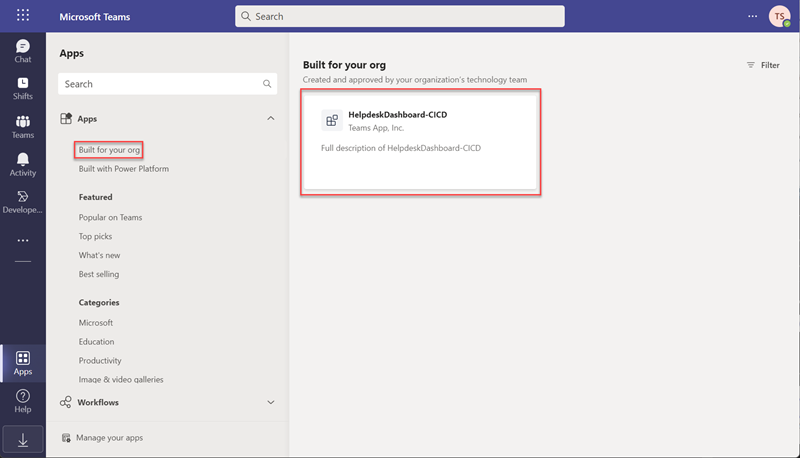
Select Built for your org, and click HelpdeskDashboard-CICD app to install the Teams app to a test team.
-
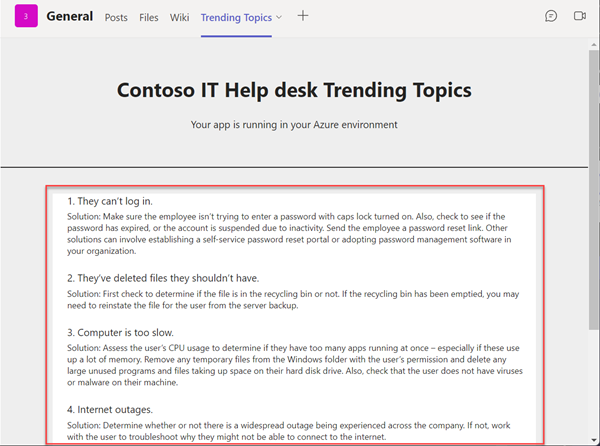
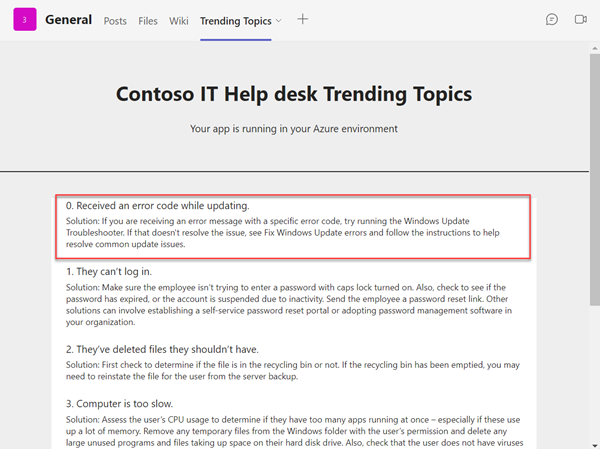
In the Trending Topics tab you installed, observe these data items, next we will update the source code to automatically update the content of this tab.
-
Open Visual Studio Code, then locate and open the ./tabs/src/components/TrendingTab.tsx file.
-
Locate the statement
const items = [, add a data item to the array. e.g.{ header: '0. Received an error code while updating.', content: `Solution: If you are receiving an error message with a specific error code, try running the Windows Update Troubleshooter. If that doesn't resolve the issue, see Fix Windows Update errors and follow the instructions to help resolve common update issues.`, }, -
Commit and push the change to your repo.
-
Wait for the helpdesk-cd pipeline to deploy the latest commit, and after waiting a bit you will notice your updates are displayed on the Trending Topics tab.
Summary
In this exercise, you created CI/CD pipelines for a custom Teams App to automate deployment.