Exercise 2: Create a custom Microsoft Teams channel or group tab
In this exercise, you’ll learn how to create a channel tab with a configuration page in a Microsoft Teams app.
[!IMPORTANT] This exercise assumes that you created the Microsoft Teams app project with the Yeoman generator that contains a personal tab from the previous unit in this module. You’ll update the project and add a channel tab in this exercise.
Task 1:Add a channel app to the Microsoft Teams app project
The Yeoman generator for Microsoft Teams can be used to add new components to an existing project. In this section, you’ll add a channel tab to the existing project.
- Execute the following command in the console from the root folder of the project:
yo teams
[!NOTE] If you see an error stating that the project has a non supported-schema, change the
$schemaandmanifestVersionproperties in the manifest.json file to a supported version. Supported versions are listed in the generator’s GitHub Wiki.
- Yeoman starts and asks you a series of questions. Answer the questions with the following values:
- You are running the generator on an already existing project… are you sure you want to continue?: Yes
- Do you want to change the current manifest version (1.13)?: No
- Quick scaffolding: Yes
- What features do you want to add to your project?: A Tab
- Default tab name (max 16 characters): ConfigMathTab
- What kind of Tab would you like to create?: Configurable
- What scopes do you intend to use for your tab?: In a Team
- Do you require Azure AD Single-Sign-On support for the tab? No
- Do you want this tab to be available in SharePoint Online?: No
-
If prompted to overwrite files, select Y.
-
After you answer the generator’s questions, the generator adds the extra files for a new component. Then it may run the
npm installcommand to ensure that any new dependencies are downloaded for the project.
Task 2: Test the channel tab
Before you customize the tab, let’s test the tab to see the experience for testing.
- From the command line, go to the root folder for the project and run the following command:
gulp ngrok-serve --debug
-
Open a browser, and go to Microsoft Teams. Sign in with the credentials of a Work and School account.
-
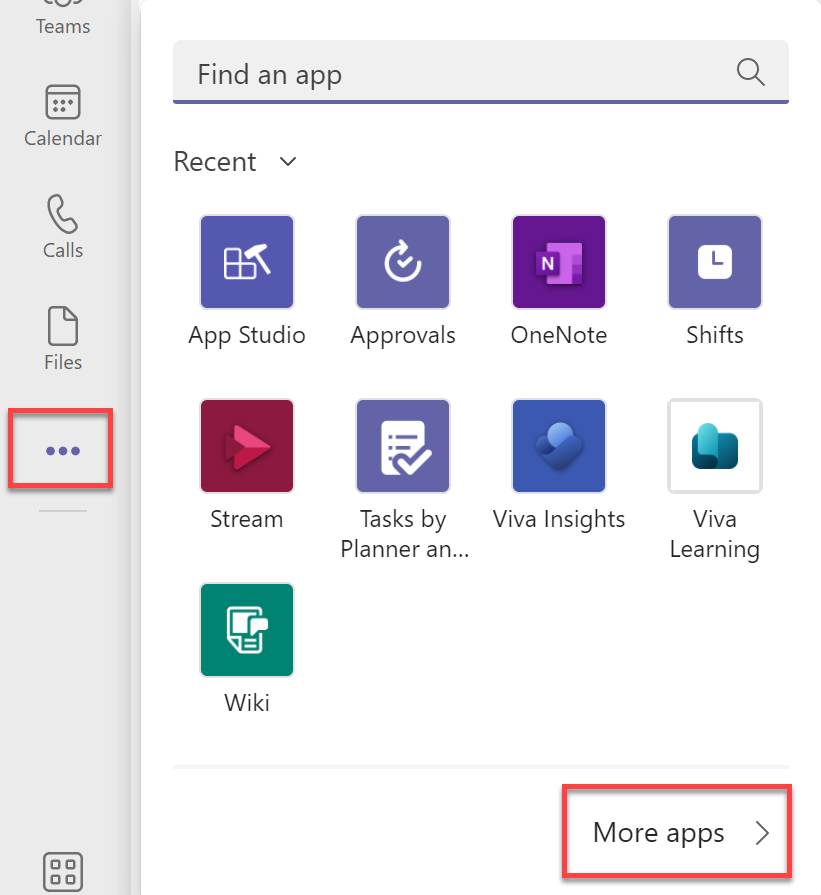
In the app bar on the left, select the More added apps button. Then select More apps.
- On the Apps page, select Manage your apps > Publish an app > Upload a custom app.
[!NOTE] If Developer Preview is turned on for Teams, the button is labelled Upload an app instead of Publish an app.
-
In the file dialog box that appears, select the Microsoft Teams package in your project. This app package is a zip file in the project’s ./package folder.
-
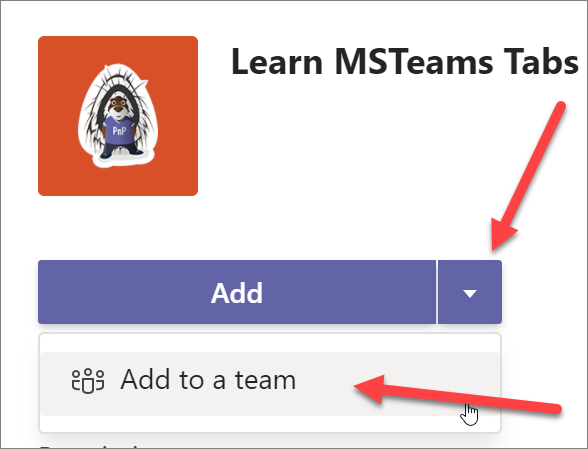
After the package is uploaded, Microsoft Teams displays a summary of the app. Select the arrow next to the Add button, and select Add to a team to install the app:
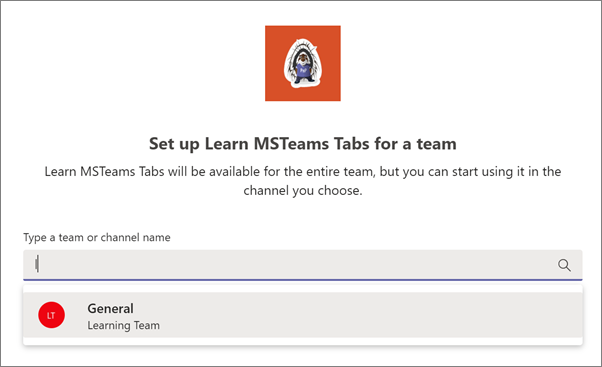
- In the Select a channel to start using dialog box, select an existing team. Then select Set up a tab:
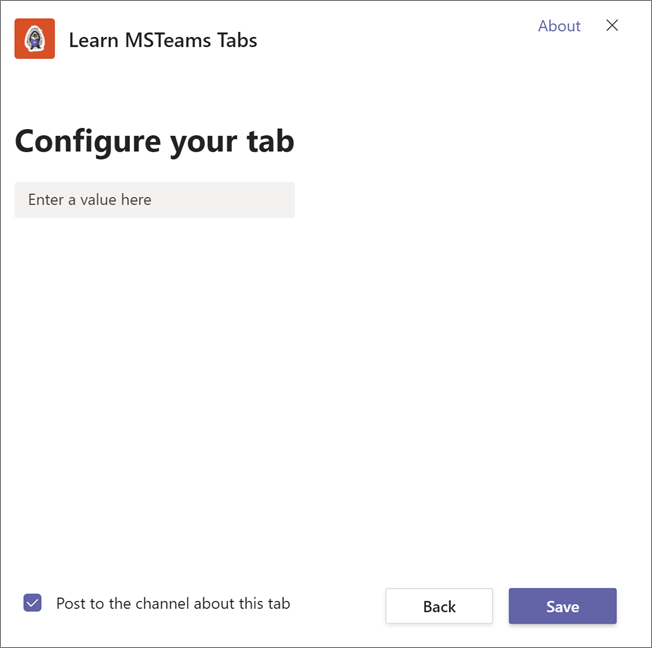
- Before the tab is added to the team, Microsoft Teams displays the tab’s configuration page:
-
Enter anything in the text box, and select Save.
-
Microsoft Teams adds the tab to the channel and displays it for you. You should see the text you entered on the configuration page displayed in the tab.
Task 3: Update the configuration tab
On the tab you create in this exercise, the user can select a math operation to do on the configuration page. This value is saved with the tab so that users of the tab can do this operation on two values to see the results.
-
The first step is to modify the configuration page.
-
Locate and open the file ./src/client/configMathTab/ConfigMathTabConfig.tsx.
-
Update the
importstatements in this file to include the components used in the configuration tab. -
Find the following
importstatement that imports the Fluent UI - React library:
import { Provider, Flex, Header, Input} from "@fluentui/react-northstar";
- Replace the previous statement with the following import statement:
import { Provider, Flex, Header, Input, DropdownProps, Dropdown } from "@fluentui/react-northstar";
- Find the following
useStatestatement:
const [text, setText] = useState<string>();
- Replace the previous statement with the following:
const [mathOperator, setMathOperator] = useState<string>();
Implement the configuration page logic and user interface
-
The configuration page displays a drop-down list of four math operators to select from. After an operator is selected, it’s saved to the page’s
idproperty with the string MathPage appended to it. This value is used by the tab page to determine what operation to perform in the tab. -
Locate the
useEffectmethod that depends upon thecontextvariable. This method sets the state of the React component. Change the statement that contains thesetTextmethod with the following code. This new code takes the value of thepage.idproperty on the tab, removes the MathPage string, and leaves only the operator.
useEffect(() => {
  if (context) {
    setMathOperator(context.page.id?.replace("MathPage", "") ?? "");
    entityId.current = context.page.id;
    pages.config.registerOnSaveHandler(onSaveHandler);
    pages.config.setValidityState(true);
    app.notifySuccess();
    }
    // eslint-disable-next-line react-hooks/exhaustive-deps
  }, [context]);
- Locate the
returnstatement. Replace it with the following code, which adds a drop-down list for the user to select the operator they want to use:
return (
  <Provider theme={theme}>
    <Flex gap="gap.smaller" style=>
      <Dropdown placeholder="Select the math operator"
        items={[
          "add",
          "subtract",
          "multiply",
          "divide"
        ]}
        onChange={(e, data) => {
          if (data) {
            const op = (data.value) ? data.value.toString() : "add";
            setMathOperator(op);
            entityId.current = `${op}MathPage`;
          }
        }}
        value={mathOperator}></Dropdown>
    </Flex>
  </Provider>
);
Test the configuration page
-
At this point, the configuration page is complete. If you removed the tab in the last step, repeat the process to upload and add it again.
-
If you didn’t remove the tab, select the menu from the tab, and then select Settings.
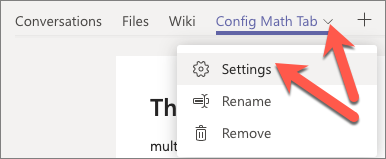
- The configuration page opens with the updated component.
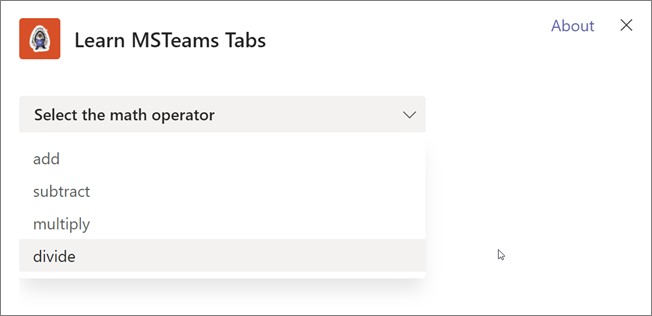
- Select one of the math operators, and save your changes by selecting Save. The tab should display the selected operator with the MathPage suffix.
Task 4: Implement the channel tab
The last step is to implement the channel tab.
- Locate and open the file ./src/client/configMathTab/ConfigMathTab.tsx.
Update the channel tab to use the FluentUI React library
- Update the
importstatements in this file to include the components used in the configuration tab. Find the followingimportstatement that imports the Fluent UI - React library:
import { Provider, Flex, Text, Button, Header } from "@fluentui/react-northstar";
- Replace the previous statement with the following import statement:
import { Provider, Flex, Text, Button, Header, Input, InputProps } from "@fluentui/react-northstar";
- Add an interface to define the state our component will use. Add the following after the
importstatements:
export interface IConfigMathTabState {
  mathOperator ?: string;
  operandA: number;
  operandB: number;
  result: string;
}
- Add the following after the existing
useStatestatements. This code defines a variable to contain the component state.
const [mathTabState, setMathTabState] = useState<IConfigMathTabState>({ mathOperator: "add" } as IConfigMathTabState);
Implement the channel page logic
- Locate the
useEffecthook that depends upon the Microsoft Teams context. This new code takes the value of theentityIdproperty on the tab, removes the MathPage string, and leaves only the operator.
useEffect(() => {
  if (context) {
    setEntityId(context.entityId);
    setMathTabState(state => ({
      ...state,
      mathOperator: context.page.id?.replace("MathPage", "") ?? ""
    } as IConfigMathTabState));
  }
}, [context]);
- Add the following event handlers to the
ConfigMathTabclass. These event handlers will update the state with the values from the controls and do the calculation of the two numbers by using the operator specified on the configuration page.
const handleOnChangedOperandA = (data?: InputProps): void => {
  if (data && !isNaN(Number(data.value))) {
    setMathTabState(state => ({
      ...state,
      operandA: data.value
    } as IConfigMathTabState));
  }
};

const handleOnChangedOperandB = (data?: InputProps): void => {
  if (data && !isNaN(Number(data.value))) {
    setMathTabState(state => ({
      ...state,
      operandB: data.value
    } as IConfigMathTabState));
  }
};

const handleOperandChange = (): void => {
  let stringResult: string = "n/a";

  if (mathTabState) {
    if (!isNaN(Number(mathTabState.operandA)) && !isNaN(Number(mathTabState.operandB))) {
      switch (mathTabState.mathOperator) {
        case "add":
          stringResult = (Number(mathTabState.operandA) + Number(mathTabState.operandB)).toString();
          break;
        case "subtract":
          stringResult = (Number(mathTabState.operandA) - Number(mathTabState.operandB)).toString();
          break;
        case "multiply":
          stringResult = (Number(mathTabState.operandA) * Number(mathTabState.operandB)).toString();
          break;
        case "divide":
          stringResult = (Number(mathTabState.operandA) / Number(mathTabState.operandB)).toString();
          break;
        default:
          stringResult = "n/a";
          break;
      }
    }
  }
  setMathTabState(state => ({
    ...state,
    result: stringResult
  } as IConfigMathTabState));
};
Implement the channel page user interface
- Locate the
returnstatement in theConfigMathTabcomponent. Replace the existing statement with the following code. This new code adds two input boxes and a button to the page. When the button is selected, it does the math operation selected on the configuration page to the two values and displays the results.
return (
  <Provider theme={theme}>
    <Flex column gap="gap.smaller">
      <Header>This is your tab</Header>
      <Text content="Enter the values to calculate" size="medium"></Text>

      <Flex gap="gap.smaller">
        <Flex.Item>
          <Flex gap="gap.smaller">
            <Flex.Item>
              <Input autoFocus
                value={mathTabState.operandA}
                onChange={(e, data) => handleOnChangedOperandA(data)}></Input>
            </Flex.Item>
            <Text content={mathTabState.mathOperator}></Text>
            <Flex.Item>
              <Input value={mathTabState.operandB}
                onChange={(e, data) => handleOnChangedOperandB(data)}></Input>
            </Flex.Item>
          </Flex>
        </Flex.Item>
        <Button content="Calculate" primary
          onClick={handleOperandChange}></Button>
        <Text content={mathTabState.result}></Text>
      </Flex>
      <Text content="(C) Copyright Contoso" size="smallest"></Text>
    </Flex>
  </Provider>
);
Test the channel tab page
At this point, the channel tab page is complete. If the web server isn’t still running, rebuild the project, and start the web server by running gulp ngrok-server –debug.
-
Open a browser, and go to Microsoft Teams. Sign in with the credentials of a Work and School account.
-
Go to the team where the tab is installed, and select the channel tab. Enter two values, and select the Calculate button. The results of the calculation appear next to the button.

-
Use the Settings link on the tab to open the configuration tab, and change the math operation.
-
Stop the local web server by selecting Ctrl+C in the console to stop the running process.
Summary
In this exercise, you created a channel tab with a configuration page in a Microsoft Teams app.