Exercise 1: Create a custom Microsoft Teams personal tab
In this exercise, you’ll create a new Microsoft Teams personal tab by using the Microsoft Teams Yeoman generator, Visual Studio Code, and the Developer Portal.
Prerequisites
Developing Microsoft Teams apps requires a Microsoft 365 tenant, Microsoft Teams configured for development, and the necessary tools installed on your workstation.
For the Microsoft 365 tenant, follow the instructions in Microsoft Teams: Prepare your Microsoft 365 tenant to obtain a developer tenant if you don’t currently have a Microsoft 365 account. Make sure you’ve also enabled Microsoft Teams for your organization.
Microsoft Teams must be configured to enable custom apps and allow custom apps to be uploaded to your tenant to build custom apps for Microsoft Teams. Follow the instructions in “Prepare your Microsoft 365 tenant” mentioned previously.
You’ll use Node.js to create custom Microsoft Teams tabs in this module. The exercises in this module assume you’ve the following tools installed on your developer workstation.
[!IMPORTANT] In most cases, installing the latest version of the following tools is the best option. The versions listed here were used when this module was published and last tested.
- Node.js - (the active LTS version)
- npm (installed with Node.js)
- Gulp-cli - v2.3.*
- Yeoman - v4.3.*
- Yeoman Generator for Microsoft Teams - v4.0.1
- Visual Studio Code
*You must have the minimum versions of these prerequisites installed on your workstation.
Task 1: Create Microsoft Teams app
-
Open your command prompt, and go to a directory where you want to save your work. Create a new folder named learn-msteams-tabs, and change the directory into that folder.
-
Run the Yeoman generator for Microsoft Teams by running the following command:
yo teams
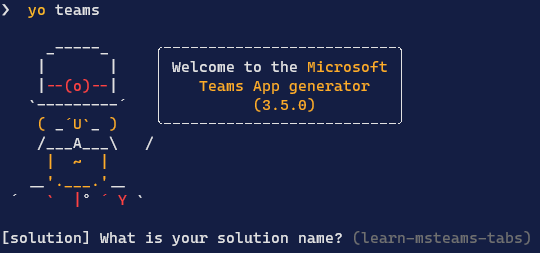
- Yeoman starts and asks you a series of questions. Answer the questions with the following values:
- What is your solution name?: Learn MSTeams Tabs
- Where do you want to place the files?: Use the current folder
- Title of your Microsoft Teams App project: Learn MSTeams Tabs
- Your (company) name (max 32 characters): Contoso
- Which manifest version would you like to use?: v1.13
- Quick scaffolding: Yes
- What features do you want to add to your project?: A tab
- The URL where you will host this solution?: (Accept the default option)
- Would you like to show a loading indicator when your app/tab loads? No
- Default Tab name (max 16 characters): LearnPersonalTab
- What kind of Tab would you like to create?: Personal (for Teams, Outlook and Office)
- Do you require Azure AD Single-Sign-On support for the tab? No
[!NOTE] Most of the answers to these questions can be changed after you create the project. For example, the URL where the project will be hosted isn’t important at the time of creating or testing the project.
- After you answer the generator’s questions, the generator creates the scaffolding for the project. The generator then runs
npm installthat downloads all the dependencies required by the project.
Ensure the project is using the latest version of Teams SDK
- Run the npm command to install the latest version of the SDK
npm i @microsoft/teams-js
Task 2: Test the personal tab
Before you customize the tab, let’s test the tab to see the initial developer experience for testing.
- From the command line, go to the root folder for the project and run the following command:
gulp ngrok-serve --debug
- This gulp task runs many other tasks all displayed within the command-line console. The ngrok-serve task builds your project and starts a local web server (http://localhost:3007). It then starts ngrok with a random subdomain that creates a secure URL to your local web server.
[!NOTE] Microsoft Teams requires all content displayed within a tab to be loaded from an HTTPS request. In development, this can be done by using the tool ngrok that creates a secure rotatable URL to your local HTTP web server. Ngrok is included as a dependency within the project, so there’s nothing to set up or configure.
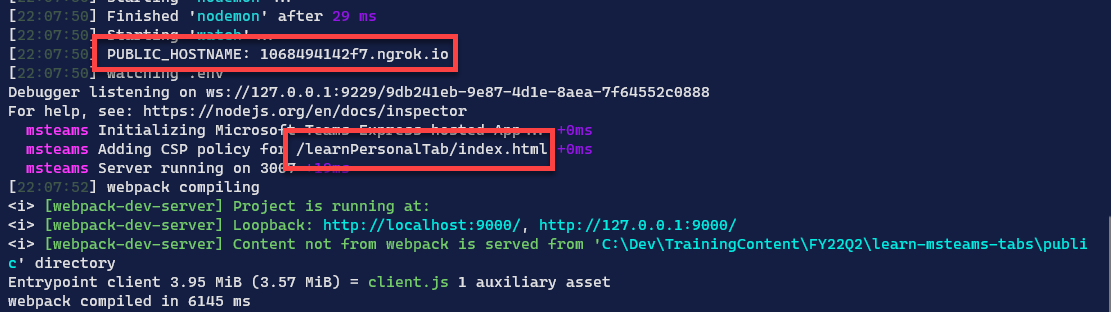
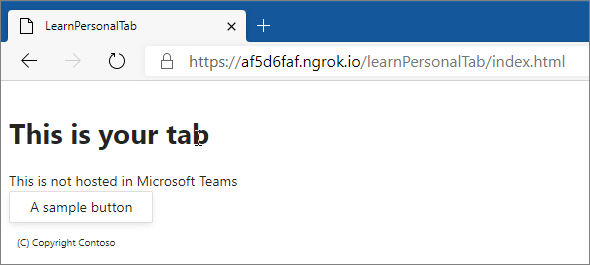
- Open a browser, and go to the ngrok URL displayed in the console.
- Update the URL in the browser to load the tab created by the scaffolding process. Here you can see the page can determine that it isn’t running within the Microsoft Teams client.
- Now let’s load the tab in Microsoft Teams. In the browser, go to Microsoft Teams. Sign in with the credentials of a Work and School account.
[!NOTE] Microsoft Teams is available for use as a web client, a desktop client, and a mobile client. In this module, we use the web client, but any of the clients can be used.
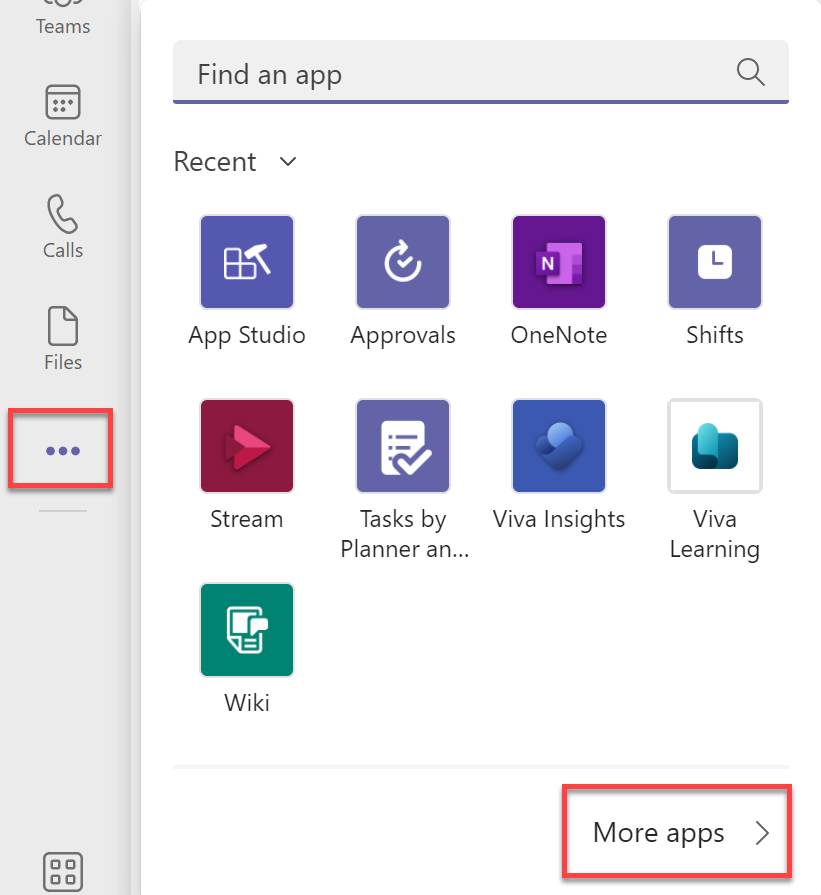
- In the app bar on the left, select the More added apps button. Then select More apps.
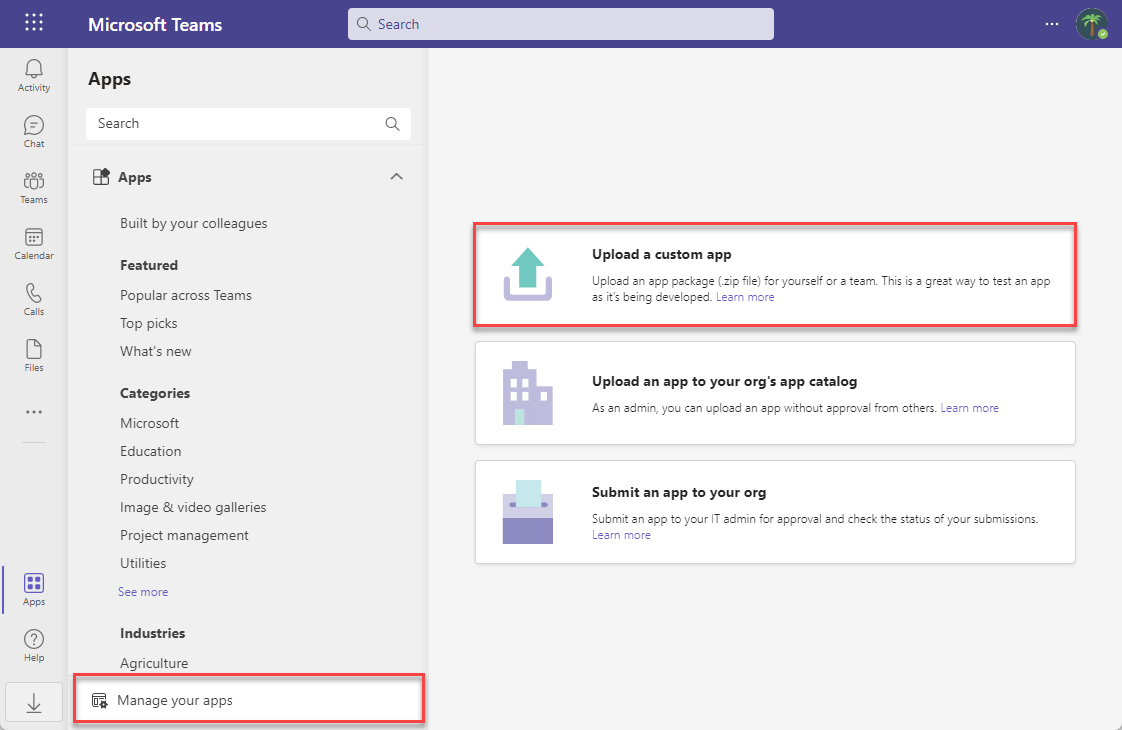
- On the Apps page, select Manage your apps > Publish an app > Upload a custom app.
[!NOTE] If Developer Preview is turned on for Teams, the button is labelled Upload an app instead of Publish an app.
-
In the file dialog box that appears, select the Microsoft Teams package in your project. This app package is a zip file in the project’s ./package folder.
-
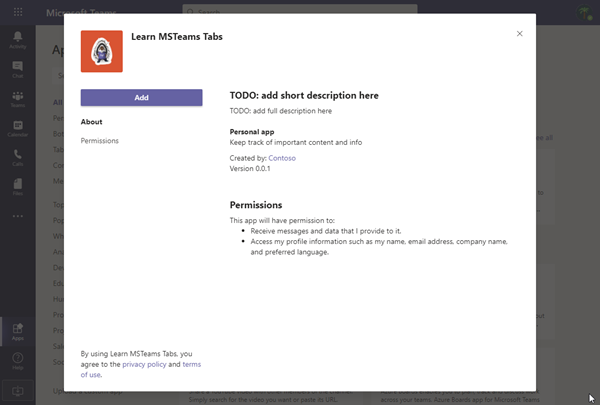
After the package is uploaded, select it to display a summary of the app. Here you can see some todo items to address. You’ll update the todo items later in the exercise.
- Select the Add button to install the app, which adds a new personal tab to your More added apps dialog box.
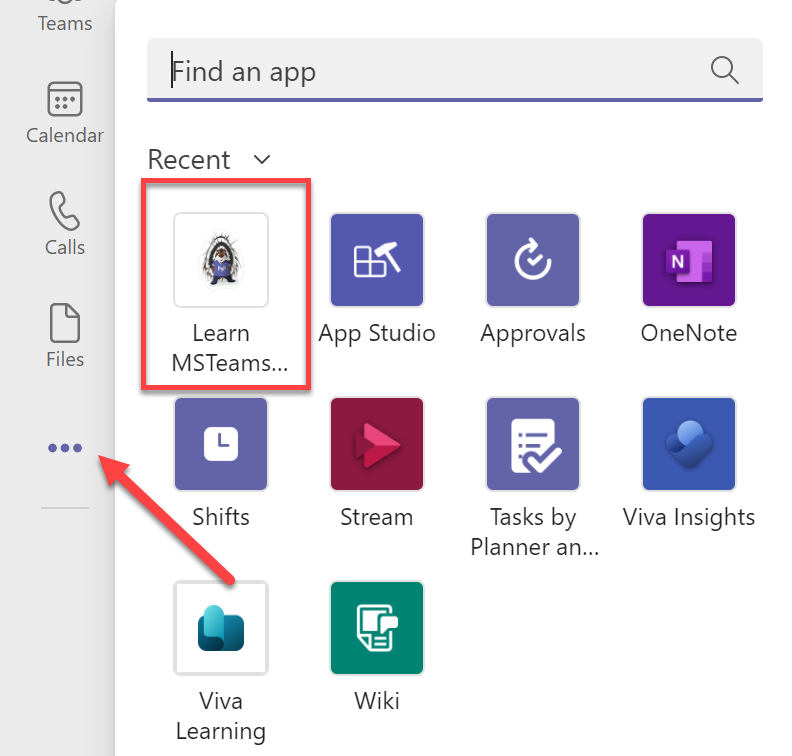
- Select the app to go to the new tab.
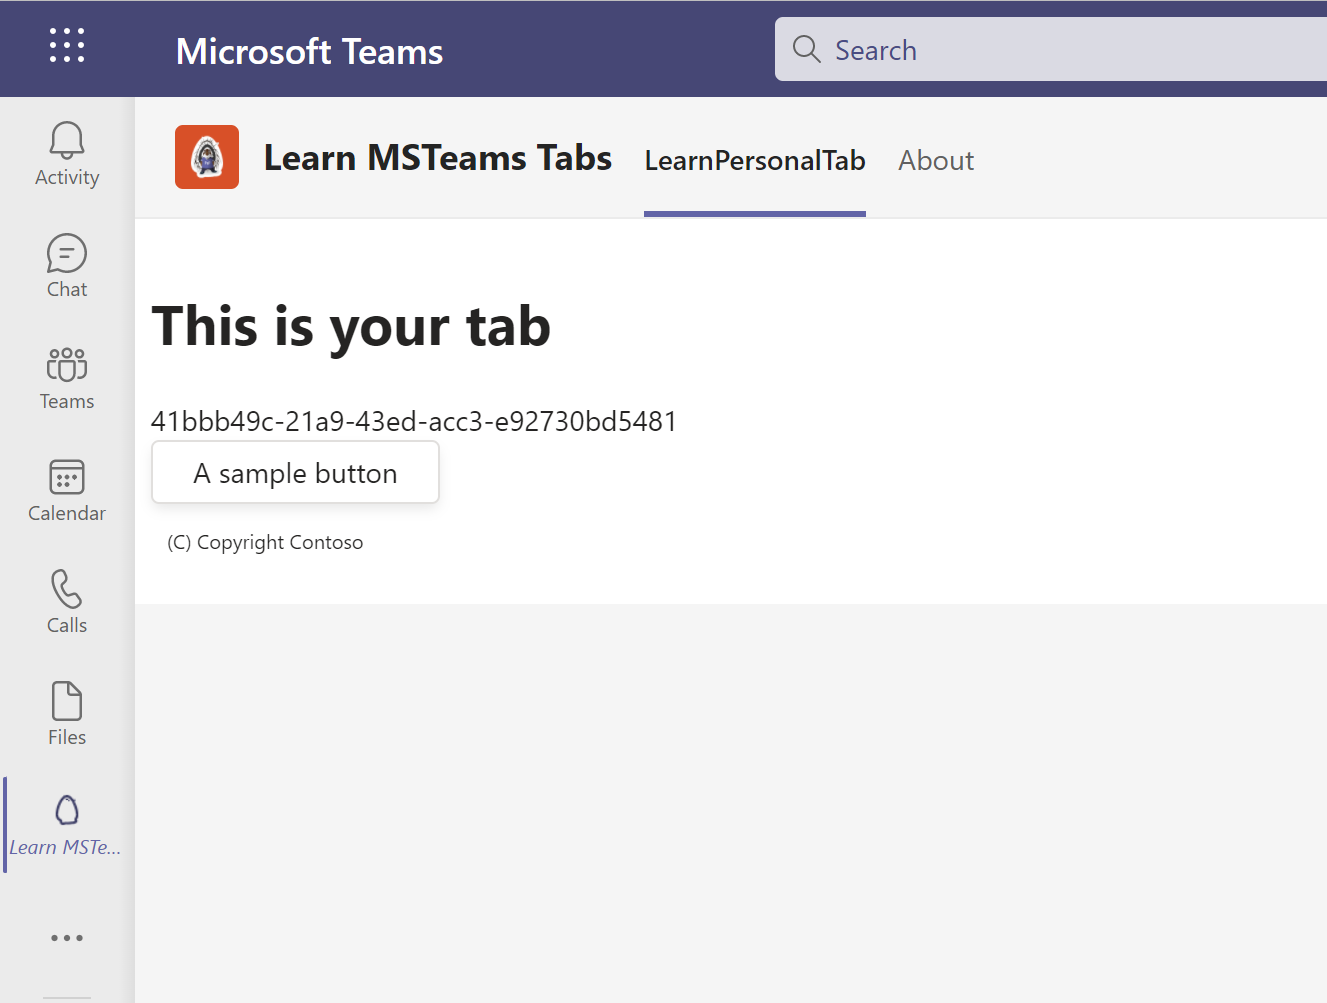
-
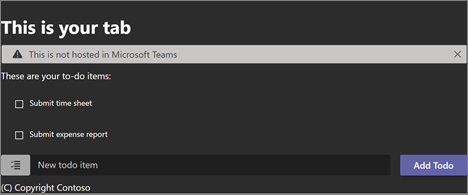
Notice that when the content page is loaded in a tab within the Microsoft Teams client, it displays the
entityIdproperty of the tab, not the message “This isn’t hosted in Microsoft Teams” as you saw when you viewed the content page in the browser. The tab can detect if it’s loaded within the Microsoft Teams client by using the Microsoft Teams JavaScript SDK. -
The next step is to make some changes to the project.
-
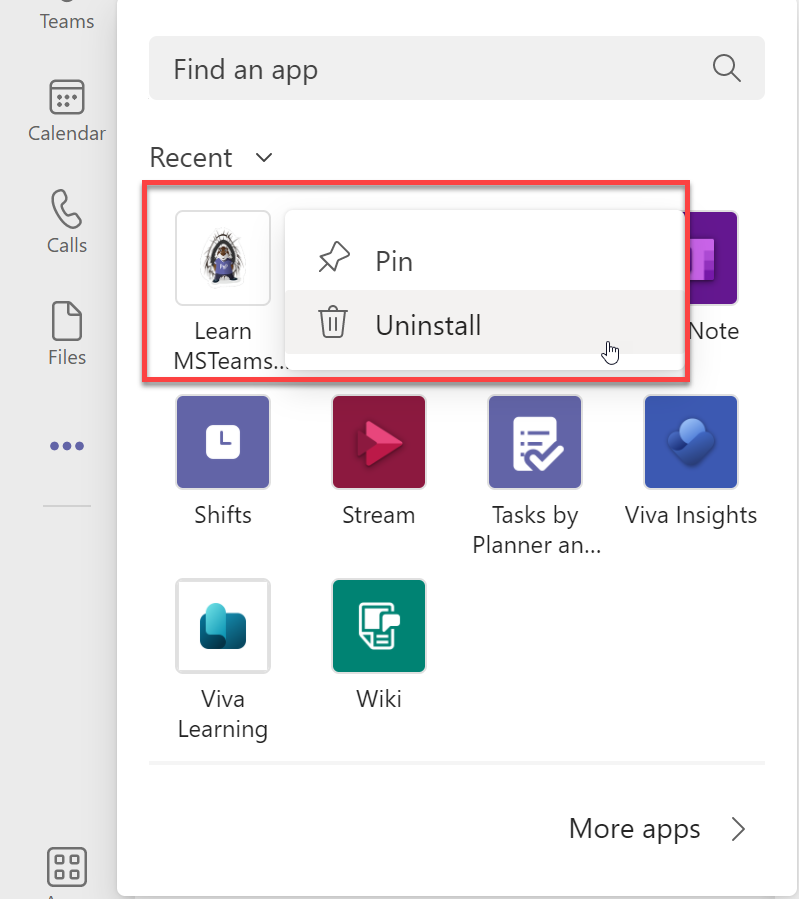
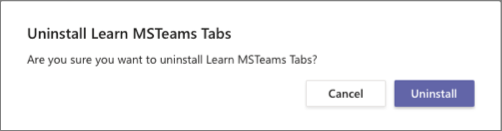
Uninstall the app by right-clicking the app in the More added apps dialog box and select Uninstall. Then select Uninstall in the confirmation dialog box that appears.
- Next, stop the local web server by selecting Ctrl+C in the console to stop the running process.
Task 3: Implement the personal tab’s user interface
Now you can implement the user interface for the tab. The simple tab has a basic interface. It presents a list of items, and users can add items to the list.
-
Locate and open the file that contains the React component used in the project: ./src/client/learnPersonalTab/LearnPersonalTab.tsx.
-
Update the
importstatements in this file to add components from the Fluent UI - React library. Find the followingimportstatement at the top of the file that imports components from the Fluent UI - React library:
import { Provider, Flex, Text, Button, Header } from "@fluentui/react-northstar";
- Replace the previous statement with the following
importstatement:
import { Provider, Flex, Text, Button, Header,
  List, Alert, WindowMaximizeIcon, ExclamationTriangleIcon,
  Label, Input, ToDoListIcon
} from "@fluentui/react-northstar";
- Next, update the state of the component to contain a list of to do items and a property for a new item. Add the following statements after the existing
useStatestatements in the LearnPersonalTab.tsx file:
const [todoItems, setTodoItems] = useState<string[]>(["Submit time sheet","Submit expense report"]);
const [newTodoValue, setNewTodoValue] = useState<string>("");
- Locate the
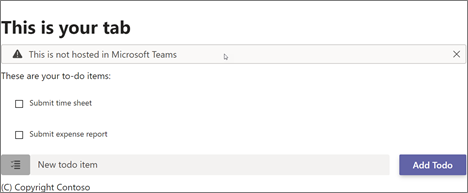
returnstatement, and update it to the following code. The component now displays the list of items in our state with a brief copyright statement.
return (
  <Provider theme={theme}>
    <Flex column gap="gap.smaller">
      <Header content="This is your tab" />
      <Alert icon={<ExclamationTriangleIcon />} content={entityId} dismissible></Alert>
      <Text content="These are your to-do items:" size="medium"></Text>
      <List selectable>
        {todoItems.map((todoItem, i) => (
          <List.Item key={i}
            media={<WindowMaximizeIcon outline />}
            content={todoItem} index={i} >
          </List.Item>))
        }
      </List>

      TODO: add new list item form here

      <Text content="(C) Copyright Contoso" size="smallest"></Text>
    </Flex>
  </Provider>
);
[!TIP] At this point, you can test your tab without loading it in Microsoft Teams. Run the command gulp ngrok-serve –debug from the command line, and go to https://
{your-ngrok-subdomain}.ngrok.io/learnPersonalTab/index.html in the browser.
Add the query string value
?theme=darkto the URL to see the theme change:
- The next step is to add some interactivity to the tab. Add the following methods to the
LearnPersonalTabclass. These methods handle updating the state when specific events happen on the form that you’ll add to the component.
const handleOnChanged = (event): void => {
  setNewTodoValue(event.target.value);
};

const handleOnClick = (event: React.MouseEvent<HTMLButtonElement>): void => {
  const newTodoItems = todoItems;
  newTodoItems.push(newTodoValue);
  setTodoItems(newTodoItems);
  setNewTodoValue("");
};
- Finally, locate the string
TODO: add new list item form herein therender()method, and replace it with the following code. This code displays a form that the user can use to add items to the list.
<Flex gap="gap.medium">
  <Flex.Item grow>
    <Flex>
      <Label icon={<ToDoListIcon />}
             styles=></Label>
      <Flex.Item grow>
        <Input placeholder="New todo item" fluid
               value={newTodoValue}
               onChange={handleOnChanged}></Input>
      </Flex.Item>
    </Flex>
  </Flex.Item>
  <Button content="Add Todo" primary
          onClick={handleOnClick}></Button>
</Flex>
Task 4: Use Developer Portal to update the Microsoft Teams app manifest
At this point, the app is complete. Recall from our initial test that when the app was added to Microsoft Teams, it had a few todo strings for the description of the app. While you could change these values in the project’s ./src/manifest/manifest.json file, you’ll use Developer Portal to make these changes.
-
First, build, and run the project by running the command gulp ngrok-serve in the command line like you did previously. This step also creates the Microsoft Teams app package.
-
In the browser, go to Developer Portal for Teams and sign in with the credentials of a Work and School account.
-
Select the Apps link in the app bar on the left, select Import App in the toolbar.
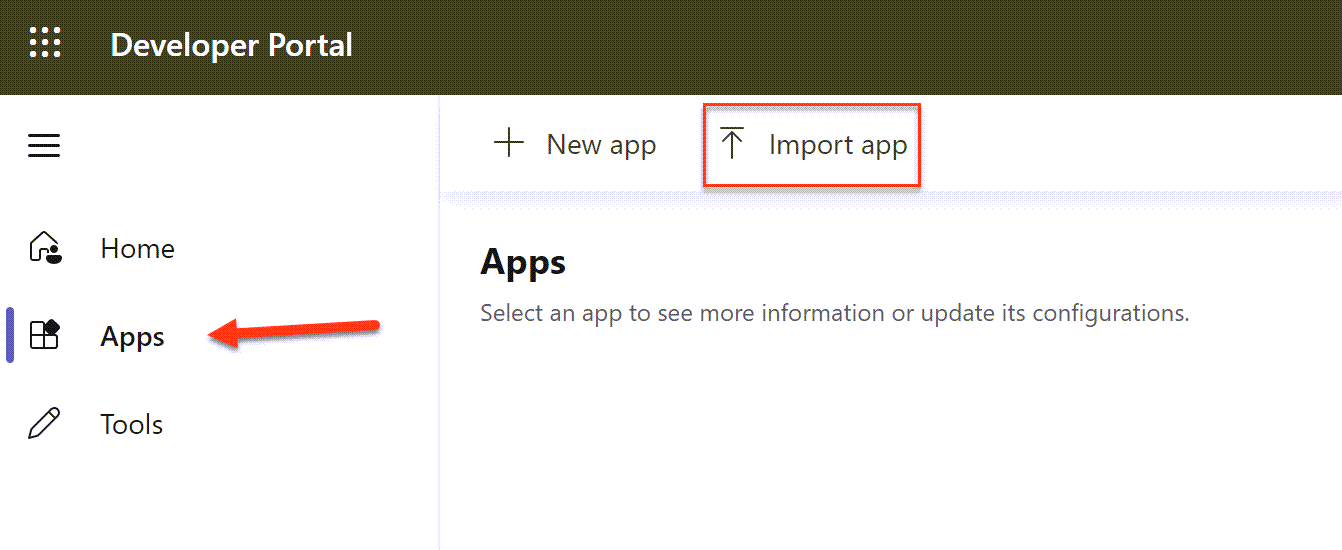
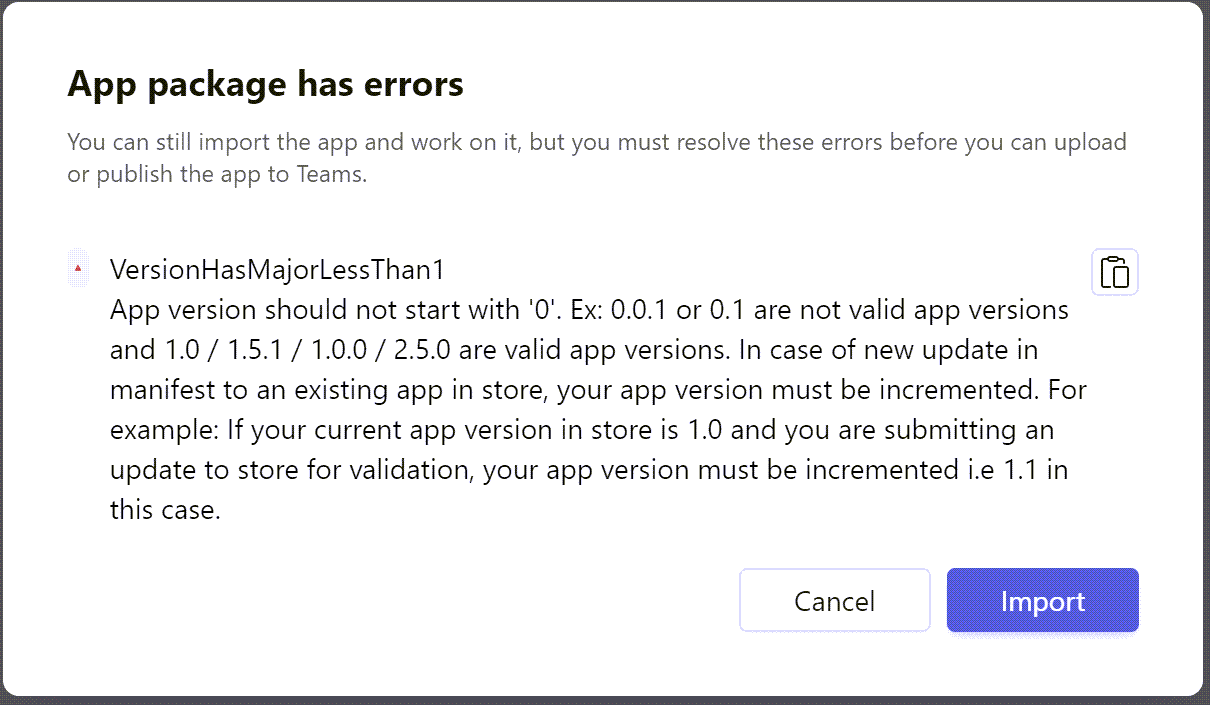
- Locate the zip file that can be found in the project’s ./package folder and open it. You’ll see a warning regarding the version number. Select Import.
-
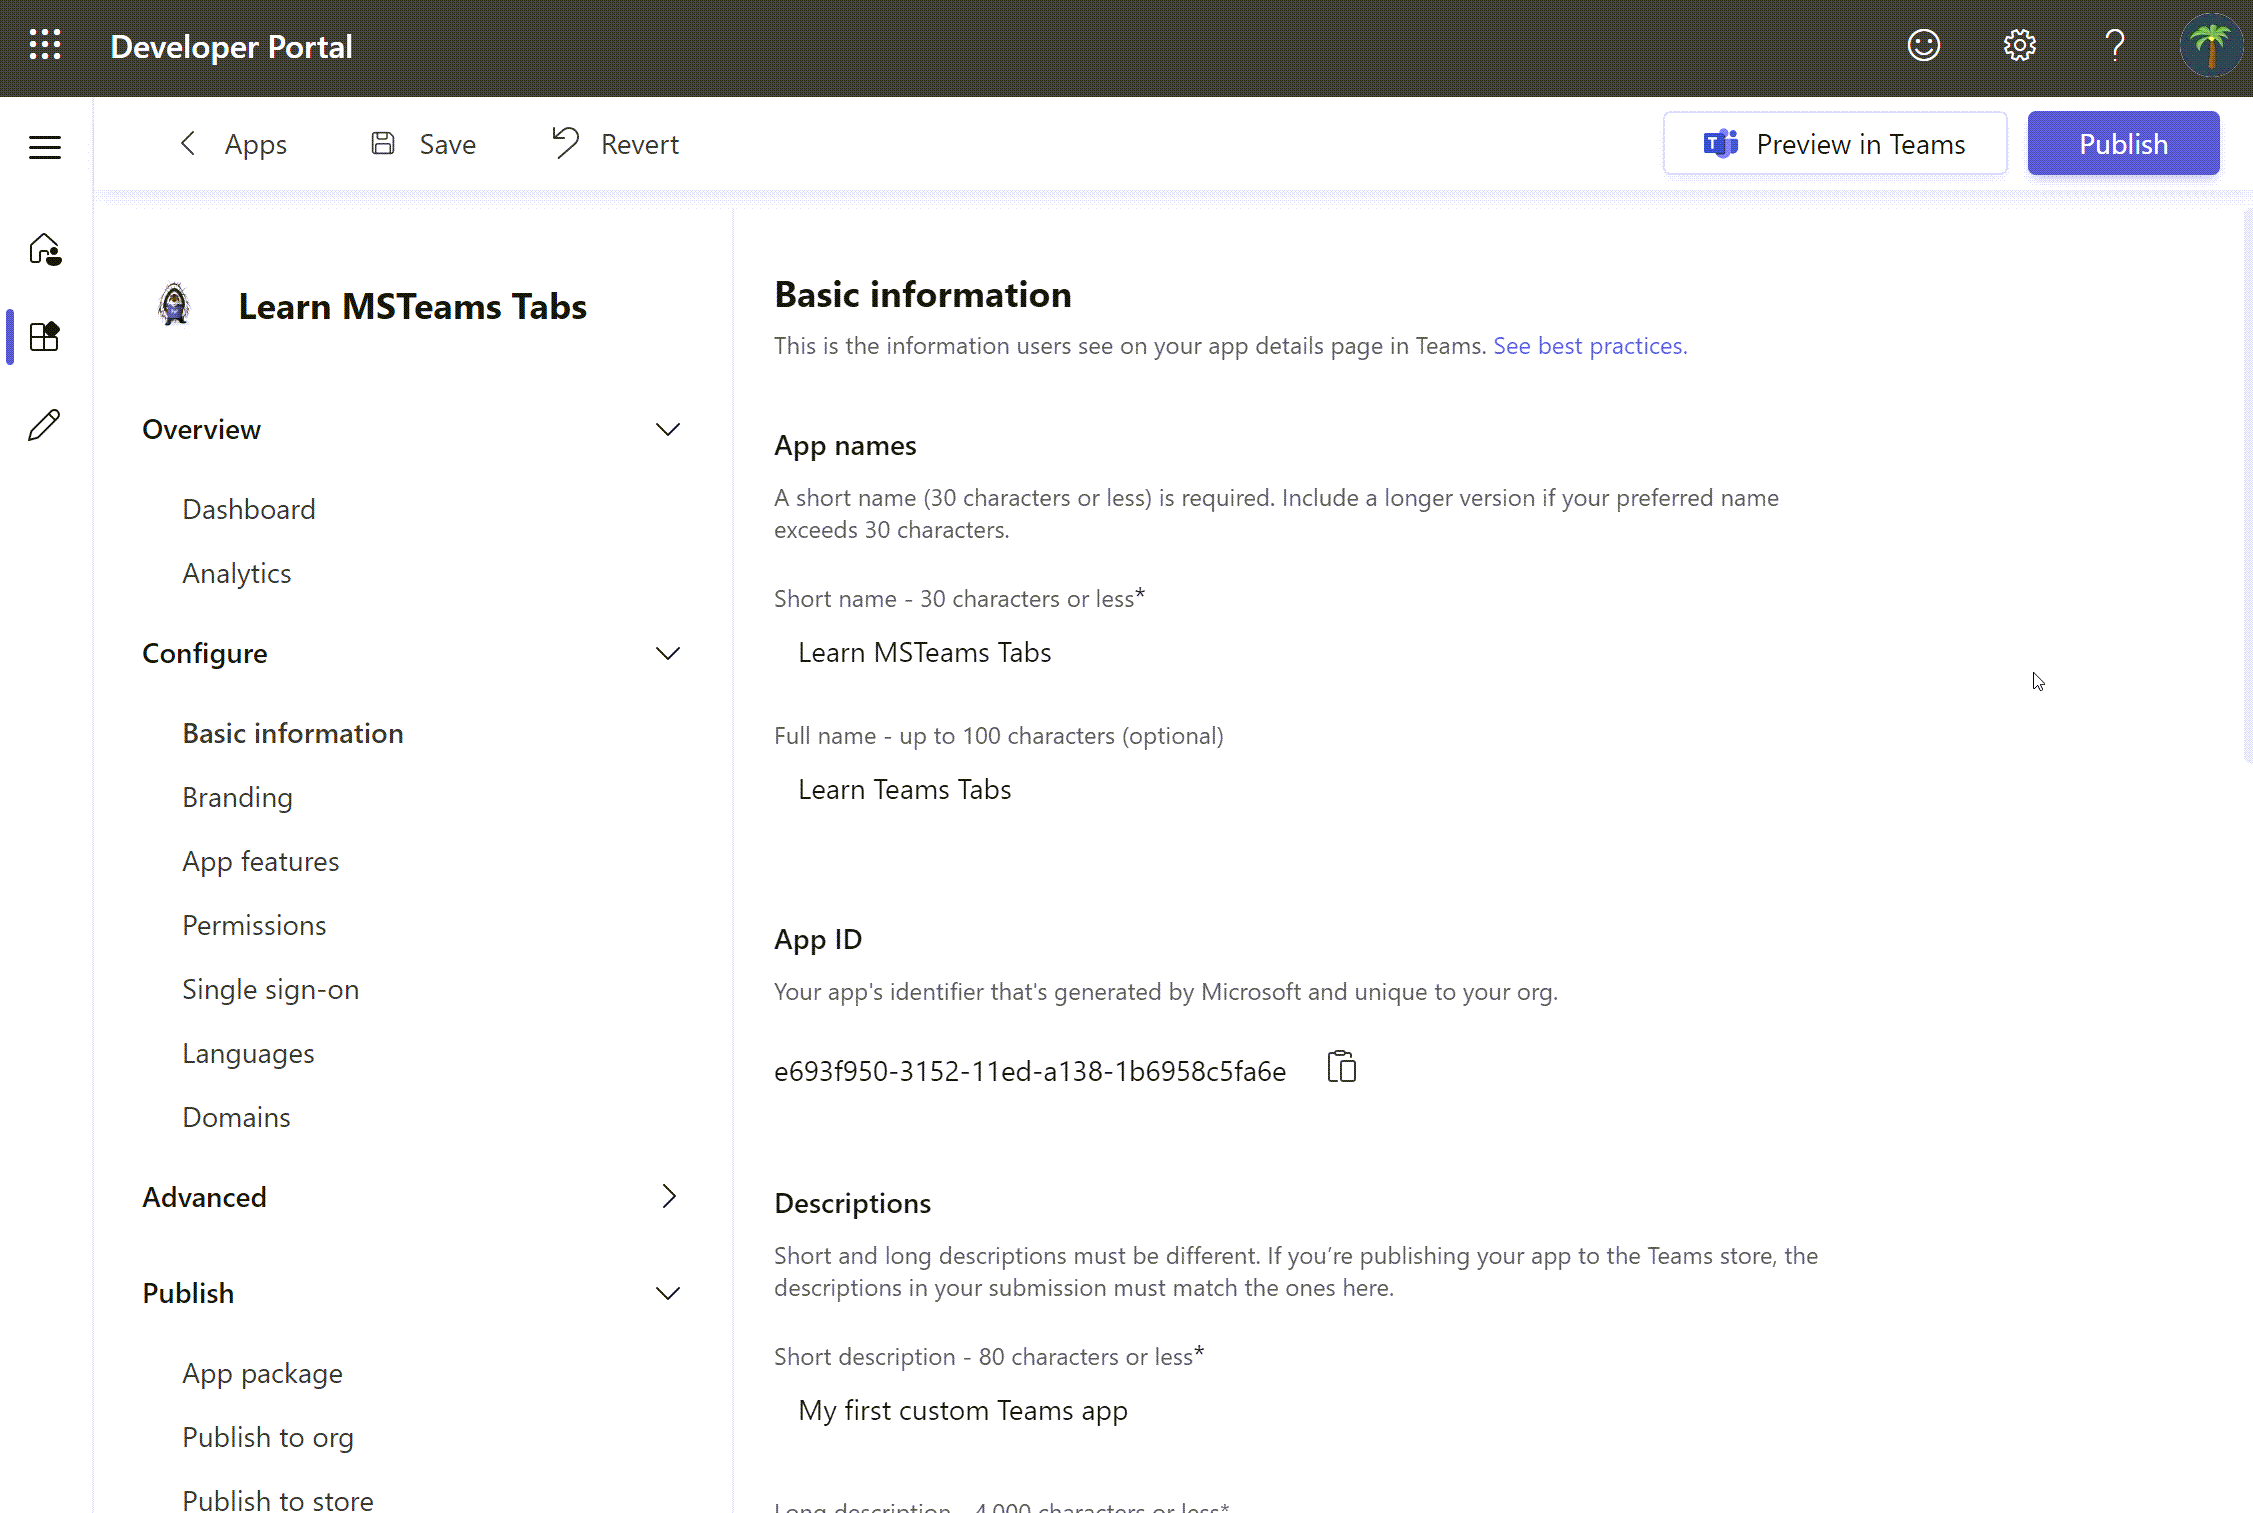
On the App details page, change the Full name of the app to Learn Teams Tabs.
-
On the App details page, scroll down to the Descriptions section and enter the following values:
- Short description: My first custom Teams app
- Full description: enter a long description
-
On the App details page, change the Version to 1.0.0.
-
Scroll to the bottom of the page and select Save.
-
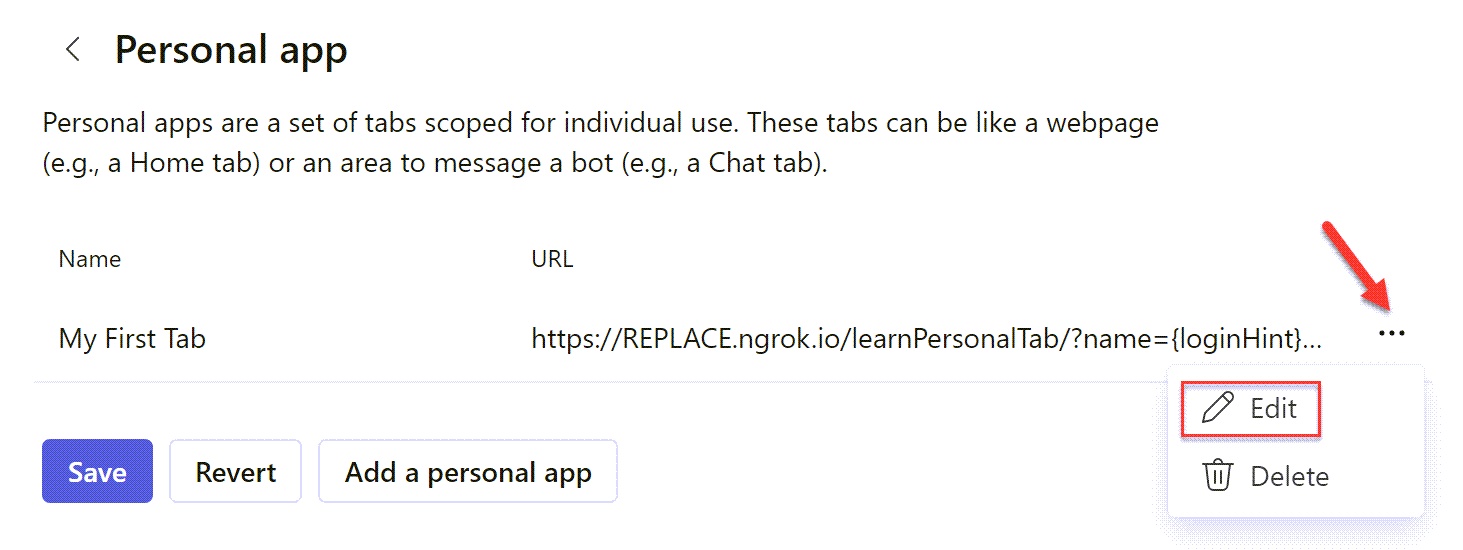
Update the name of the tab by selecting App features in the left pane in Developer Portal. Then select Personal App .
-
Locate the LearnPersonalTab in the project. Select the menu for more options on the tab, and select Edit. Change the name of the tab to My First Tab. Update the Content URL property with your new ngrok subdomain. Ensure that
&theme={theme}is added to the end of the Content URL property. Select Confirm to save your changes for the tab. Then select Save.
-
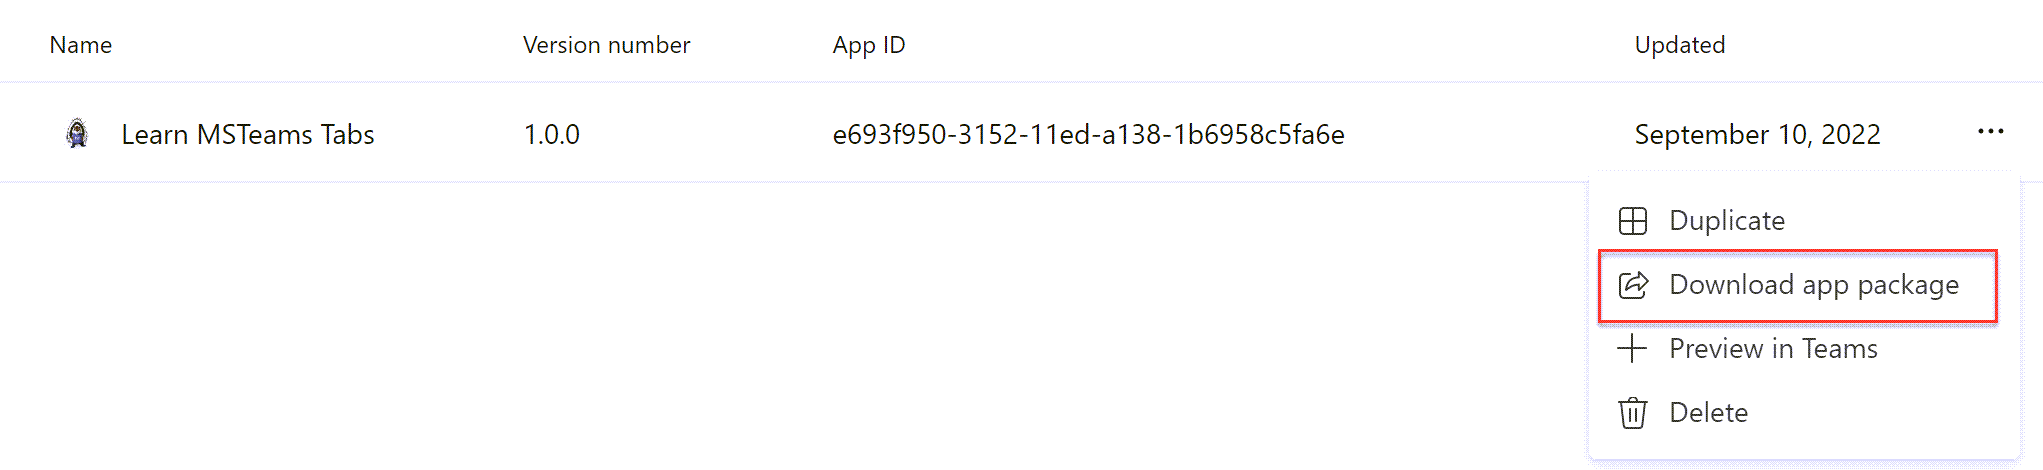
The changes made to the app within the Developer Portal aren’t saved to your project. If you want to update the project, download the app package from the portal.
-
To download the project, return to the Apps page by selecting Apps in the Toolbar.

- From the Apps page in Developer Portal, open the app’s menu and select Download app package.
[!CAUTION] Be careful if you chose to update the manifest.json file in your project with the one in the package downloaded from Developer Portal.
The manifest file in your project contains placeholder strings that are updated by the build and debugging process that’s replaced when you test the project. Using placeholder strings simplifies the development and debugging process.
For example, the placeholder `` is replaced with the hosting URL of the app each time the package is re-created.
So you might not want to completely replace the existing manifest.json file with the file generated by Developer Portal.
Summary
In this exercise, you created a new Microsoft Teams personal tab by using the Microsoft Teams Yeoman generator, Visual Studio Code, and Developer Portal.