Exercise 2: Microsoft Graph change notifications
In this exercise, you’ll extend the existing ASP.NET Core web API application to receive notifications from Microsoft Graph subscriptions. The notifications are sent after a subscription is successfully created, requesting Microsoft Graph to notify an endpoint when specified entities are created, updated, or deleted.
[!IMPORTANT] This exercise assumes you have created the Azure AD application and .NET console application from the previous unit in this module. You’ll edit the existing Azure AD application and .NET console application created in that exercise in this exercise.
Task 1: Update the ASP.NET Core web API project
- Open the Program.cs file and replace the entire contents with the following code:
using System;
using System.Collections.Generic;
using System.Linq;
using System.Threading.Tasks;
using Microsoft.AspNetCore.Hosting;
using Microsoft.Extensions.Configuration;
using Microsoft.Extensions.Hosting;
using Microsoft.Extensions.Logging;

namespace msgraphapp
{
    public class Program
    {
        public static void Main(string[] args)
        {
            CreateHostBuilder(args).Build().Run();
        }

        public static IHostBuilder CreateHostBuilder(string[] args) =>
            Host.CreateDefaultBuilder(args)
                .ConfigureWebHostDefaults(webBuilder =>
                {
                    webBuilder.UseStartup<Startup>();
                });
    }
}
- If the project doesn’t contain a file named Startup.cs, then add it in the root of the project. Open the Startup.cs file and replace the entire contents with the following code:
using System;
using System.Collections.Generic;
using System.Linq;
using System.Threading.Tasks;
using Microsoft.AspNetCore.Builder;
using Microsoft.AspNetCore.Hosting;
using Microsoft.AspNetCore.HttpsPolicy;
using Microsoft.AspNetCore.Mvc;
using Microsoft.Extensions.Configuration;
using Microsoft.Extensions.DependencyInjection;
using Microsoft.Extensions.Hosting;
using Microsoft.Extensions.Logging;
using Microsoft.OpenApi.Models;

namespace msgraphapp
{
    public class Startup
    {
        public Startup(IConfiguration configuration)
        {
            Configuration = configuration;
        }

        public IConfiguration Configuration { get; }

        // This method gets called by the runtime. Use this method to add services to the container.
        public void ConfigureServices(IServiceCollection services)
        {

            services.AddControllers();
            services.AddSwaggerGen(c =>
            {
                c.SwaggerDoc("v1", new OpenApiInfo { Title = "msgraphapp", Version = "v1" });
            });
        }

        // This method gets called by the runtime. Use this method to configure the HTTP request pipeline.
        public void Configure(IApplicationBuilder app, IWebHostEnvironment env)
        {
            if (env.IsDevelopment())
            {
                app.UseDeveloperExceptionPage();
                app.UseSwagger();
                app.UseSwaggerUI(c => c.SwaggerEndpoint("/swagger/v1/swagger.json", "msgraphapp v1"));
            }

            app.UseRouting();

            app.UseAuthorization();

            app.UseEndpoints(endpoints =>
            {
                endpoints.MapControllers();
            });
        }
    }
}
Add model class
The application uses several new model classes for (de)serialization of messages to/from the Microsoft Graph.
-
Create a new folder named Models in the root of the project.
-
Create a new file named MyConfig.cs in the Models folder and add the following code:
namespace msgraphapp
{
  public class MyConfig
  {
    public string AppId { get; set; } = string.Empty;
    public string AppSecret { get; set; } = string.Empty;
    public string TenantId { get; set; } = string.Empty;
    public string Ngrok { get; set; } = string.Empty;
  }
}
- Open the Startup.cs file. Locate the method
ConfigureServices()method and add the following code at the end of the method:
var config = new MyConfig();
Configuration.Bind("MyConfig", config);
services.AddSingleton(config);
- Open the appsettings.json file and replace the content with the following JSON.
{
  "Logging": {
    "LogLevel": {
      "Default": "Warning"
    }
  },
  "MyConfig":
  {
    "AppId": "<APP ID>",
    "AppSecret": "<APP SECRET>",
    "TenantId": "<TENANT ID>",
    "Ngrok": "<NGROK URL>"
  }
}
- Replace the following variables with the values you copied earlier:
<NGROK URL>: set to the https ngrok url you copied earlier<TENANT ID>: set to your Office 365 tenant ID you copied earlier<APP ID>&<APP SECRET>: set to the application ID and secret you copied earlier when you registered the app in the Azure AD admin center
Add notification controller
The application requires a new controller to process the subscription and notification.
-
Right-click the Controllers folder, select New File, and name the controller NotificationsController.cs.
-
Replace the contents of NotificationsController.cs with the following code:
using System;
using System.Collections.Generic;
using System.IO;
using System.Linq;
using System.Net.Http;
using System.Threading.Tasks;
using Microsoft.AspNetCore.Mvc;
using System.Text.Json;
using System.Net;
using System.Threading;
using Microsoft.Graph;
using Microsoft.Identity.Client;
using System.Net.Http.Headers;

namespace msgraphapp.Controllers
{
  [Route("api/[controller]")]
  [ApiController]
  public class NotificationsController : ControllerBase
  {
    private readonly MyConfig config;

    public NotificationsController(MyConfig config)
    {
      this.config = config;
    }

    [HttpGet]
    public async Task<ActionResult<string>> Get()
    {
      var graphServiceClient = GetGraphClient();

      var sub = new Microsoft.Graph.Subscription();
      sub.ChangeType = "updated";
      sub.NotificationUrl = config.Ngrok + "/api/notifications";
      sub.Resource = "/users";
      sub.ExpirationDateTime = DateTime.UtcNow.AddMinutes(5);
      sub.ClientState = "SecretClientState";

      var newSubscription = await graphServiceClient
        .Subscriptions
        .Request()
        .AddAsync(sub);

      return $"Subscribed. Id: {newSubscription.Id}, Expiration: {newSubscription.ExpirationDateTime}";
    }

    public async Task<ActionResult<string>> Post([FromQuery]string? validationToken = null)
    {
      // handle validation
      if(!string.IsNullOrEmpty(validationToken))
      {
        Console.WriteLine($"Received Token: '{validationToken}'");
        return Ok(validationToken);
      }

      // handle notifications
      using (StreamReader reader = new StreamReader(Request.Body))
      {
        string content = await reader.ReadToEndAsync();

        Console.WriteLine(content);

        var notifications = JsonSerializer.Deserialize<ChangeNotificationCollection>(content);

        if (notifications != null) {
          foreach(var notification in notifications.Value)
          {
            Console.WriteLine($"Received notification: '{notification.Resource}', {notification.ResourceData.AdditionalData["id"]}");
          }
        }
      }

      return Ok();
    }

    private GraphServiceClient GetGraphClient()
    {
      var graphClient = new GraphServiceClient(new DelegateAuthenticationProvider((requestMessage) => {
        // get an access token for Graph
        var accessToken = GetAccessToken().Result;

        requestMessage
            .Headers
            .Authorization = new AuthenticationHeaderValue("bearer", accessToken);

        return Task.FromResult(0);
      }));

      return graphClient;
    }

    private async Task<string> GetAccessToken()
    {
      IConfidentialClientApplication app = ConfidentialClientApplicationBuilder.Create(config.AppId)
        .WithClientSecret(config.AppSecret)
        .WithAuthority($"https://login.microsoftonline.com/{config.TenantId}")
        .WithRedirectUri("https://daemon")
        .Build();

      string[] scopes = new string[] { "https://graph.microsoft.com/.default" };

      var result = await app.AcquireTokenForClient(scopes).ExecuteAsync();

      return result.AccessToken;
    }

  }
}
- Save all files.
Update the Visual Studio Code debugger launch configuration
By default, the .NET Core launch configuration will open a browser and navigate to the default URL for the application when launching the debugger. For this application, we instead want to navigate to the ngrok URL. If you leave the launch configuration as is, each time you debug the application it will display a broken page. You can just change the URL, or change the launch configuration to not launch the browser.
-
In Visual Studio Code, open the file .vscode/launch.json.
-
Delete the following section in the default configuration:
// Enable launching a web browser when ASP.NET Core starts. For more information: https://aka.ms/VSCode-CS-LaunchJson-WebBrowser
"serverReadyAction": {
  "action": "openExternally",
  "pattern": "^\\s*Now listening on:\\s+(https?://\\S+)"
},
-
Save your changes.
-
Ensure the port being used to host the application matches the port that ngrok was configure to use.
-
Open the file Properties/launchSettings.json.
-
Set the value for profiles.msgraphapp.applicationUrl to
https://localhost:5001;http://localhost:5000. -
Save your changes.
Test the application
-
In Visual Studio Code, select Run > Start debugging to run the application. Visual Studio Code will build and start the application.
-
Once you see the following in the Debug Console window…
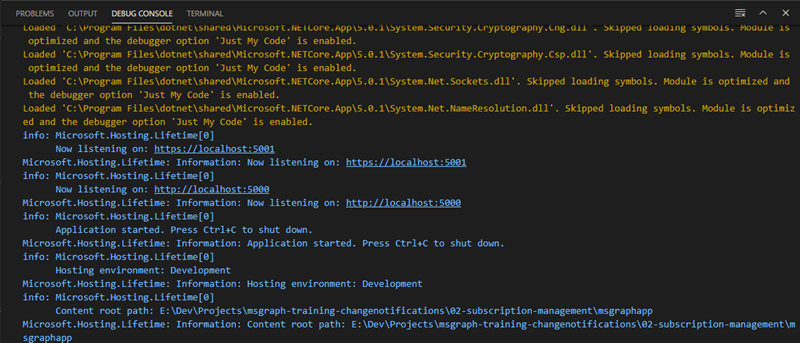
- Open a browser and navigate to http://localhost:5000/api/notifications to subscribe to change notifications. If successful you’ll see output that includes a subscription ID like the one below:

-
Your application is now subscribed to receive notifications from the Microsoft Graph when an update is made on any user in the Office 365 tenant.
-
Now, test the subscription by updating a user to trigger a notification from Microsoft Graph:
-
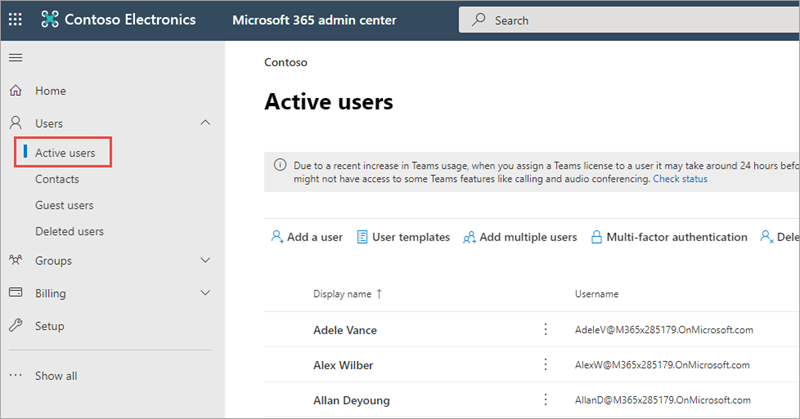
Open a browser and navigate to the Microsoft 365 admin center (https://admin.microsoft.com/AdminPortal).
-
If you’re prompted to sign-in, sign-in using an admin account.
-
Select Users > Active users.
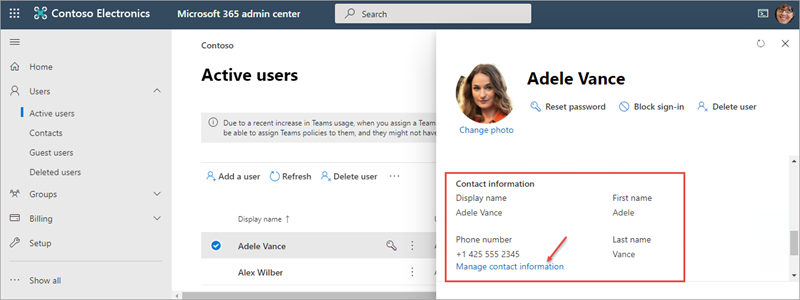
- Select an active user and select Edit for their Contact information.
-
Update the Phone number value with a new number and Select Save.
-
In the Visual Studio Code Debug Console, you’ll see a notification has been received. Sometimes this may take a few minutes to arrive. An example of the output is below:
Received notification: 'Users/7a7fded6-0269-42c2-a0be-512d58da4463', 7a7fded6-0269-42c2-a0be-512d58da4463
- This indicates the application successfully received the notification from the Microsoft Graph for the user specified in the output. You can then use this information to query the Microsoft Graph for the users full details if you want to synchronize their details into your application.
Renew subscriptions
Subscriptions for notifications expire and need to be renewed periodically. The following steps will demonstrate how to renew notifications
-
Open Controllers/NotificationsController.cs file
-
Add the following two member declarations to the
NotificationsControllerclass:
private static Dictionary<string, Subscription> Subscriptions = new Dictionary<string, Subscription>();
private static Timer? subscriptionTimer = null;
- Add the following new methods. These will implement a background timer that will run every 15 seconds to check if subscriptions have expired. If they have, they’ll be renewed.
private void CheckSubscriptions(Object? stateInfo)
{
  AutoResetEvent? autoEvent = stateInfo as AutoResetEvent;

  Console.WriteLine($"Checking subscriptions {DateTime.Now.ToString("h:mm:ss.fff")}");
  Console.WriteLine($"Current subscription count {Subscriptions.Count()}");

  foreach(var subscription in Subscriptions)
  {
    // if the subscription expires in the next 2 min, renew it
    if(subscription.Value.ExpirationDateTime < DateTime.UtcNow.AddMinutes(2))
    {
      RenewSubscription(subscription.Value);
    }
  }
}

private async void RenewSubscription(Subscription subscription)
{
  Console.WriteLine($"Current subscription: {subscription.Id}, Expiration: {subscription.ExpirationDateTime}");

  var graphServiceClient = GetGraphClient();

  var newSubscription = new Subscription
  {
    ExpirationDateTime = DateTime.UtcNow.AddMinutes(5)
  };

  await graphServiceClient
    .Subscriptions[subscription.Id]
    .Request()
    .UpdateAsync(newSubscription);

  subscription.ExpirationDateTime = newSubscription.ExpirationDateTime;
  Console.WriteLine($"Renewed subscription: {subscription.Id}, New Expiration: {subscription.ExpirationDateTime}");
}
- The
CheckSubscriptions()method is called every 15 seconds by the timer.
[!TIP] For production use this should be set to a more reasonable value to reduce the number of unnecessary calls to Microsoft Graph.
-
The
RenewSubscription()method renews a subscription and is only called if a subscription is going to expire in the next two minutes. -
Locate the method
Get()and replace it with the following code:
[HttpGet]
public async Task<ActionResult<string>> Get()
{
  var graphServiceClient = GetGraphClient();

  var sub = new Microsoft.Graph.Subscription();
  sub.ChangeType = "updated";
  sub.NotificationUrl = config.Ngrok + "/api/notifications";
  sub.Resource = "/users";
  sub.ExpirationDateTime = DateTime.UtcNow.AddMinutes(15);
  sub.ClientState = "SecretClientState";

  var newSubscription = await graphServiceClient
    .Subscriptions
    .Request()
    .AddAsync(sub);

  Subscriptions[newSubscription.Id] = newSubscription;

  if (subscriptionTimer == null)
  {
    subscriptionTimer = new Timer(CheckSubscriptions, null, 5000, 15000);
  }

  return $"Subscribed. Id: {newSubscription.Id}, Expiration: {newSubscription.ExpirationDateTime}";
}
Test the changes
-
Within Visual Studio Code, select Run > Start debugging to run the application.
-
Navigate to the following url: http://localhost:5000/api/notifications. This will register a new subscription.
-
In the Visual Studio Code Debug Console window, approximately every 15 seconds, notice the timer checking the subscription for expiration:
Checking subscriptions 12:32:51.882
Current subscription count 1
- Wait a few minutes and you’ll see the following when the subscription needs renewing:
Renewed subscription: 07ca62cd-1a1b-453c-be7b-4d196b3c6b5b, New Expiration: 3/10/2019 7:43:22 PM +00:00
- This indicates that the subscription was renewed and shows the new expiry time.
Summary
In this exercise, you extended the existing ASP.NET Core web API application to receive notifications from Microsoft Graph subscriptions. The notifications are sent after a subscription is successfully created, requesting Microsoft Graph to notify an endpoint when specified entities are created, updated, or deleted.