Exercise 1: Working with users in the organization
In this exercise, you’ll create an Azure AD application registration using the Azure Active Directory admin center, a .NET Core console application, and query Microsoft Graph for user data.
Prerequisites
Developing Microsoft Graph apps requires a Microsoft 365 tenant.
For the Microsoft 365 tenant, follow the instructions on the Microsoft 365 Developer Program site for obtaining a developer tenant if you don’t currently have a Microsoft 365 account.
You’ll use the .NET SDK to create custom Microsoft Graph app in this module. The exercises in this module assume you have the following tools installed on your developer workstation.
[!IMPORTANT] In most cases, installing the latest version of the following tools is the best option. The versions listed here were used when this module was published and last tested.
- .NET SDK - v5.*
- Visual Studio Code
You must have the minimum versions of these prerequisites installed on your workstation.
Task 1: Create an Azure AD application
-
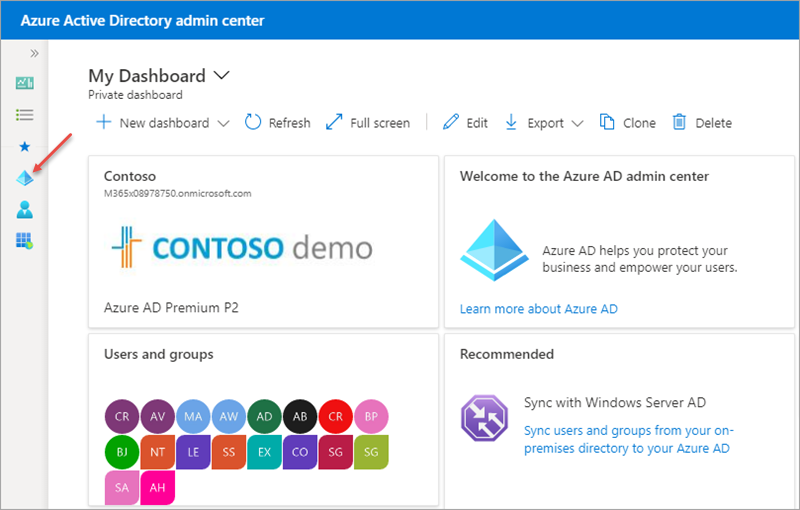
Open a browser and navigate to the Azure Active Directory admin center (https://aad.portal.azure.com). Sign in using a Work or School Account that has global administrator rights to the tenancy.
-
Select Azure Active Directory in the left-hand navigation.
-
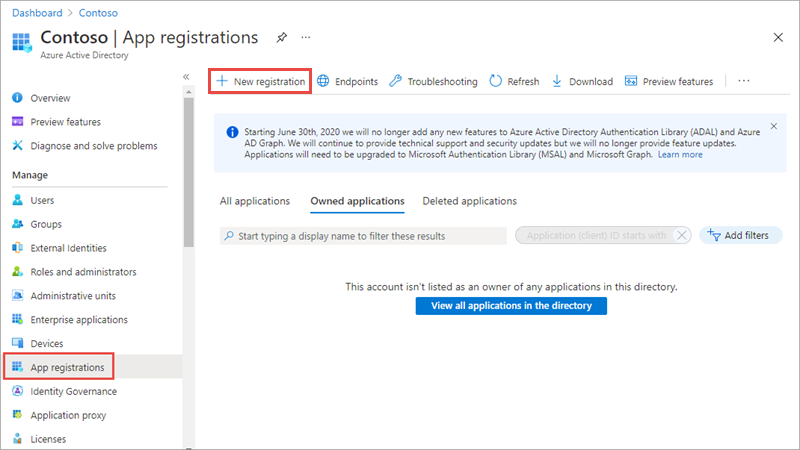
Select Manage > App registrations in the left-hand navigation.
- On the App registrations page, select New registration.
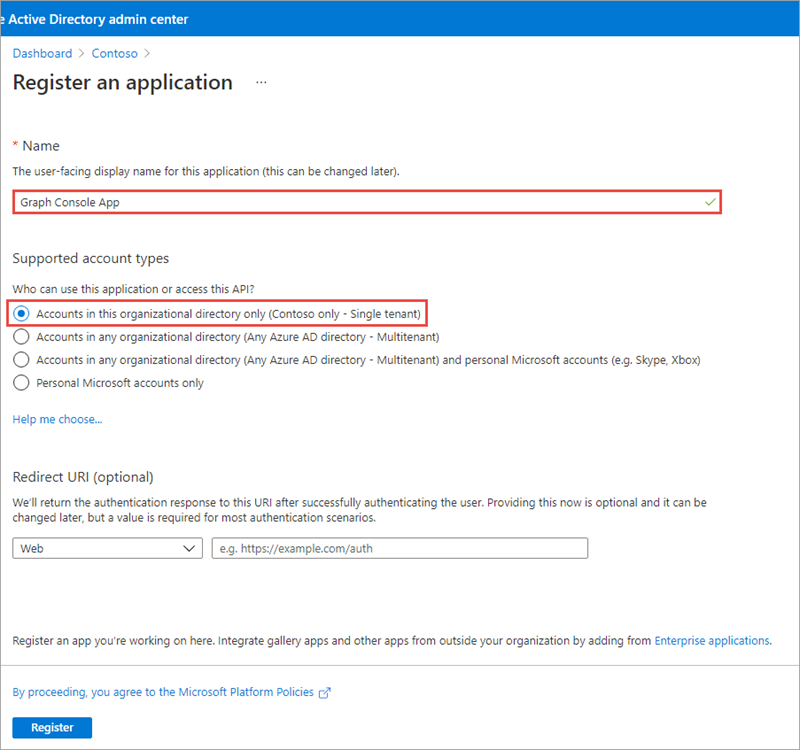
- On the Register an application page, set the values as follows:
- Name: Graph Console App
-
Supported account types: Accounts in this organizational directory only (Contoso only - Single tenant)
-
Select Register.
-
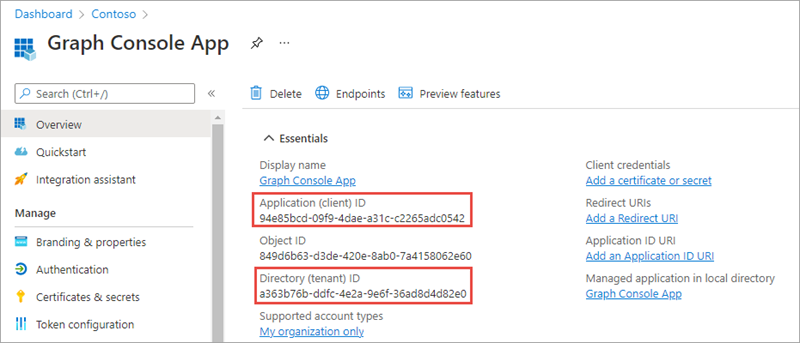
On the Graph Console App page, copy the value of the Application (client) ID and Directory (tenant) ID; you’ll need these in the application.
-
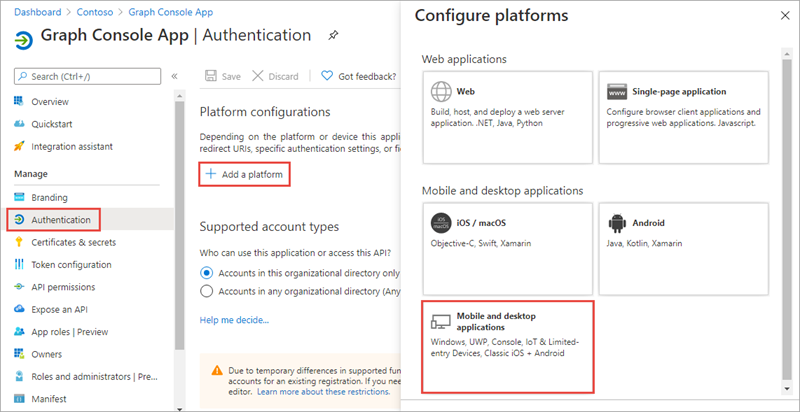
Select Manage > Authentication.
-
In the Platform configurations section, select the Add a platform button. Then in the Configure platforms panel, select the Mobile and desktop applications button:
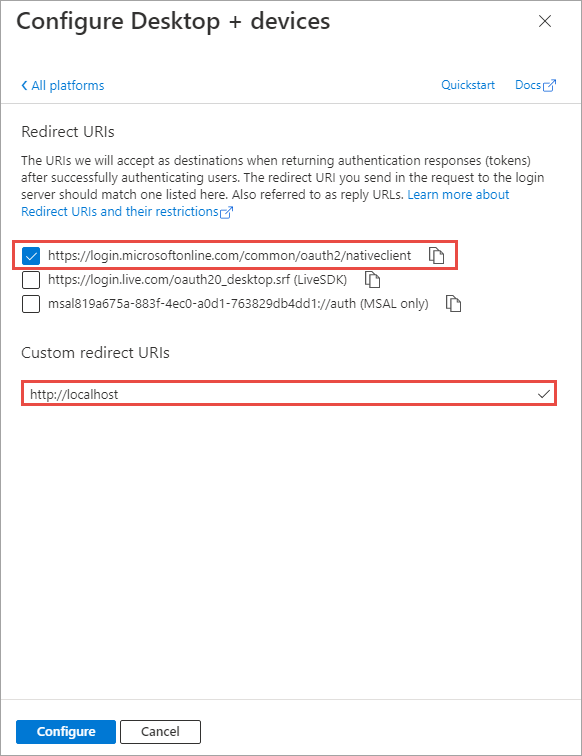
- In the Redirect URIs section of the Configure Desktop + devices panel, select the checkbox that ends with nativeclient, set Custom redirect URIs to http://localhost, and then select the Configure button:
Grant Azure AD application permissions to Microsoft Graph
After creating the application, you need to grant it the necessary permissions to Microsoft Graph.
- Select API Permissions in the left-hand navigation panel.
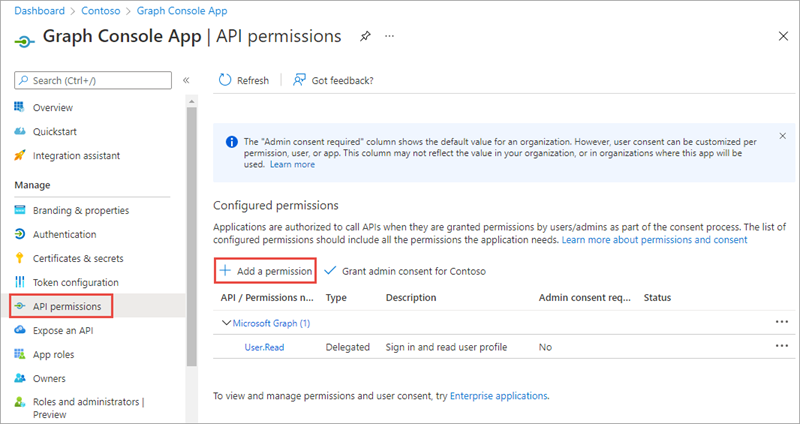
-
Select the Add a permission button.
-
In the Request API permissions panel that appears, select Microsoft Graph from the Microsoft APIs tab.
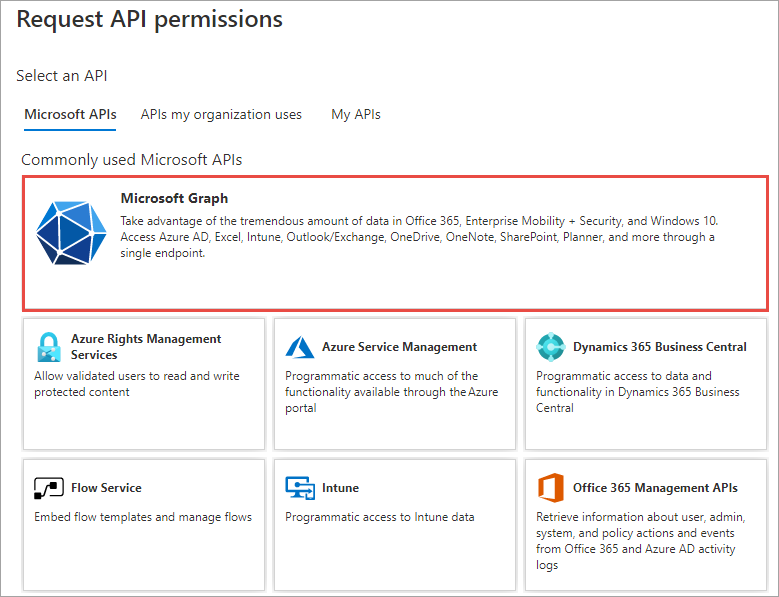
-
When prompted for the type of permission, select Delegated permissions.
-
Enter User.R in the Select permissions search box and select the User.Read.All permission, followed by the Add permission button at the bottom of the panel.
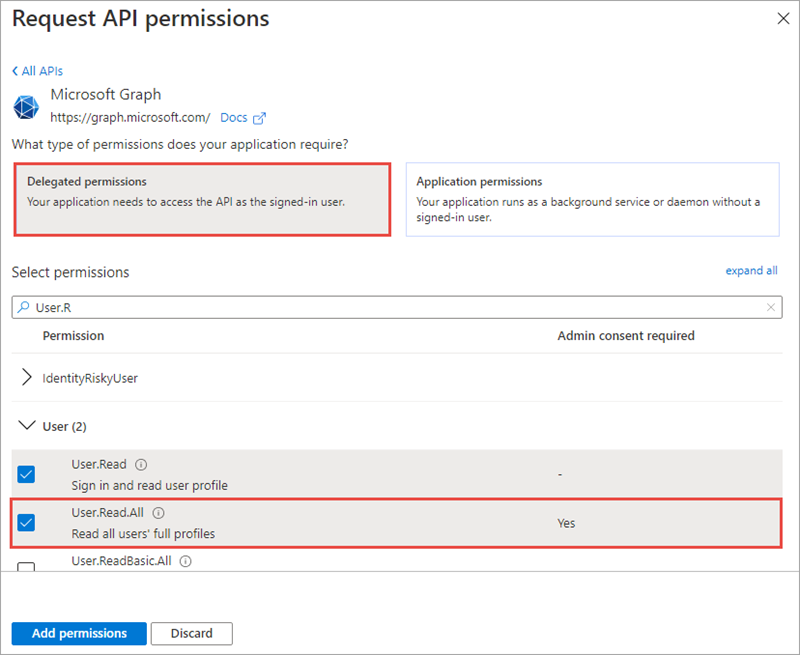
- In the Configured Permissions panel, select the button Grant admin consent for [tenant], and then select the Yes button in the consent dialog to grant all users in your organization this permission.
[!NOTE] The option to Grant admin consent in the Azure AD admin center simplifies the exercise by pre-consenting the permissions to the users in the tenant.
Task 2: Create .NET Core console application
- Open your command prompt, navigate to a directory where you have rights to create your project, and run the following command to create a new .NET Core console application:
dotnet new console -o graphconsoleapp
- After creating the application, run the following commands to ensure your new project runs correctly:
cd graphconsoleapp
dotnet nuget add source --name nuget.org https://api.nuget.org/v3/index.json
dotnet add package Microsoft.Identity.Client
dotnet add package Microsoft.Graph
dotnet add package Microsoft.Extensions.Configuration
dotnet add package Microsoft.Extensions.Configuration.FileExtensions
dotnet add package Microsoft.Extensions.Configuration.Json
[!NOTE] Be sure to confirm that each package is successfully installed before proceeding.
- Open the application in Visual Studio Code using the following command:
code .
- If Visual Studio code displays a dialog box asking if you want to add required assets to the project, select Yes.
Update the console app to enable nullable reference types
Nullable reference types refer to a group of features introduced in C# 8.0 that you can use to minimize the likelihood that your code causes the runtime to throw System.NullReferenceException.
Nullable reference types are enabled by default in .NET 6 projects, they’re disabled by default in .NET 5 projects.
Ensuring that nullable reference types are enabled isn’t related to the use of Microsoft Graph, it just ensures the exercises in this module can contain a single set of code that will compile without warnings when using either .NET 5 or .NET 6.
Open the graphconsoleapp.csproj file and ensure the <PropertyGroup> element contains the following child element:
<Nullable>enable</Nullable>
Update the console app to support Azure AD authentication
- Create a new file named appsettings.json in the root of the project and add the following code to it:
{
  "tenantId": "YOUR_TENANT_ID_HERE",
  "applicationId": "YOUR_APP_ID_HERE"
}
- Update properties with the following values:
YOUR_TENANT_ID_HERE: Azure AD directory IDYOUR_APP_ID_HERE: Azure AD client ID
Create helper class
-
Create a new folder Helpers in the project.
-
Create a new file MsalAuthenticationProvider.cs in the Helpers folder and add the following code:
using System.Net.Http.Headers;
using Microsoft.Identity.Client;
using Microsoft.Graph;

namespace Helpers
{
  public class MsalAuthenticationProvider : IAuthenticationProvider
  {
    private static MsalAuthenticationProvider? _singleton;
    private IPublicClientApplication _clientApplication;
    private string[] _scopes;
    private string? _userId;

    private MsalAuthenticationProvider(IPublicClientApplication clientApplication, string[] scopes)
    {
      _clientApplication = clientApplication;
      _scopes = scopes;
      _userId = null;
    }

    public static MsalAuthenticationProvider GetInstance(IPublicClientApplication clientApplication, string[] scopes)
    {
      if (_singleton == null)
      {
        _singleton = new MsalAuthenticationProvider(clientApplication, scopes);
      }

      return _singleton;
    }

    public async Task AuthenticateRequestAsync(HttpRequestMessage request)
    {
      var accessToken = await GetTokenAsync();

      request.Headers.Authorization = new AuthenticationHeaderValue("bearer", accessToken);
    }

    public async Task<string> GetTokenAsync()
    {
      if (!string.IsNullOrEmpty(_userId))
      {
        try
        {
          var account = await _clientApplication.GetAccountAsync(_userId);

          if (account != null)
          {
            var silentResult = await _clientApplication.AcquireTokenSilent(_scopes, account).ExecuteAsync();
            return silentResult.AccessToken;
          }
        }
        catch (MsalUiRequiredException) { }
      }

      var result = await _clientApplication.AcquireTokenInteractive(_scopes).ExecuteAsync();
      _userId = result.Account.HomeAccountId.Identifier;
      return result.AccessToken;
    }
  }
}
Incorporate Microsoft Graph into the console app
- Open the Program.cs file and replace the entire contents with the following code:
using System;
using System.Collections.Generic;
using System.Net;
using System.Net.Http;
using System.Net.Http.Headers;
using System.Security;
using System.Threading.Tasks;
using Microsoft.Identity.Client;
using Microsoft.Graph;
using Microsoft.Extensions.Configuration;
using Helpers;

namespace graphconsoleapp
{
    public class Program
    {
        public static void Main(string[] args)
        {
            Console.WriteLine("Hello World!");
        }
    }
}
- Add the following method
LoadAppSettingsto theProgramclass. The method retrieves the configuration details from the appsettings.json file previously created:
private static IConfigurationRoot? LoadAppSettings()
{
  try
  {
    var config = new ConfigurationBuilder()
                      .SetBasePath(System.IO.Directory.GetCurrentDirectory())
                      .AddJsonFile("appsettings.json", false, true)
                      .Build();

    if (string.IsNullOrEmpty(config["applicationId"]) ||
        string.IsNullOrEmpty(config["tenantId"]))
    {
      return null;
    }

    return config;
  }
  catch (System.IO.FileNotFoundException)
  {
    return null;
  }
}
- Add the following method
CreateAuthorizationProviderto theProgramclass. The method will create an instance of the clients used to call Microsoft Graph.
private static IAuthenticationProvider CreateAuthorizationProvider(IConfigurationRoot config)
{
  var clientId = config["applicationId"];
  var authority = $"https://login.microsoftonline.com/{config["tenantId"]}/v2.0";

  List<string> scopes = new List<string>();
  scopes.Add("https://graph.microsoft.com/.default");

  var cca = PublicClientApplicationBuilder.Create(clientId)
                                          .WithAuthority(authority)
                                          .WithDefaultRedirectUri()
                                          .Build();
  return MsalAuthenticationProvider.GetInstance(cca, scopes.ToArray());
}
- Add the following method
GetAuthenticatedGraphClientto theProgramclass. The method creates an instance of theGraphServiceClientobject.
private static GraphServiceClient GetAuthenticatedGraphClient(IConfigurationRoot config)
{
  var authenticationProvider = CreateAuthorizationProvider(config);
  var graphClient = new GraphServiceClient(authenticationProvider);
  return graphClient;
}
- Locate the
Mainmethod in theProgramclass. Add the following code to the end of theMainmethod to load the configuration settings from the appsettings.json file:
var config = LoadAppSettings();
if (config == null)
{
  Console.WriteLine("Invalid appsettings.json file.");
  return;
}
- Add the following code to the end of the
Mainmethod, just after the code added in the last step. This code will obtain an authenticated instance of theGraphServiceClient:
var client = GetAuthenticatedGraphClient(config);
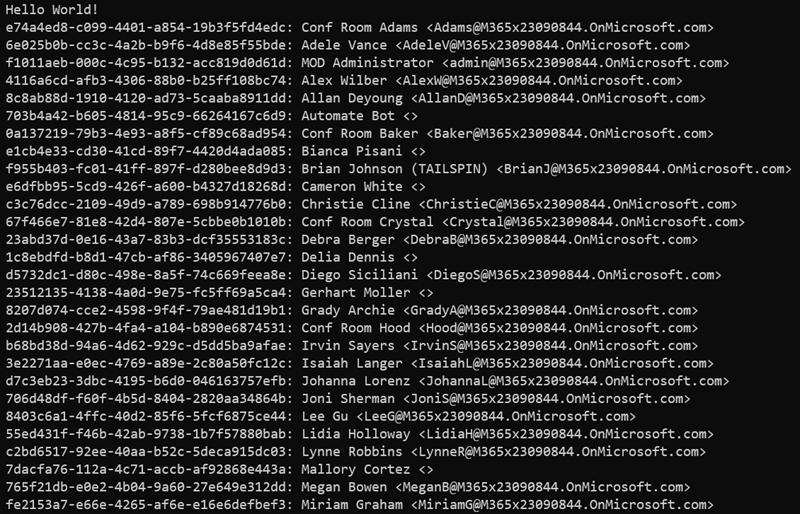
- Add the following code to request all users from the current organization and write them to the console.
// request 1 - all users
var requestAllUsers = client.Users.Request();

var results = requestAllUsers.GetAsync().Result;
foreach (var user in results)
{
  Console.WriteLine(user.Id + ": " + user.DisplayName + " <" + user.Mail + ">");
}

Console.WriteLine("\nGraph Request:");
Console.WriteLine(requestAllUsers.GetHttpRequestMessage().RequestUri);
Build and test the application
- Run the following command in a command prompt to ensure the developer certificate has been trusted:
dotnet dev-certs https --trust
- Run the following command in a command prompt to compile the console application:
dotnet build
- Run the following command to run the console application:
dotnet run
You now need to authenticate with Azure Active Directory. A new tab in your default browser should open to a page asking you to sign-in. After you’ve logged in successfully, you’ll be redirected to a page displaying the message, “Authentication complete. You can return to the application. Feel free to close this browser tab”. You may now close the browser tab and switch back to the console application.
- The application will write information about all users in the organization to the console:
Task 3: Display the currently signed in user’s details
Now, update the console app to show details on the current user.
-
Locate the code you added above for
// request 1 - all usersand comment it out so it doesn’t continue to execute. -
Add the following code to the
Mainmethod of the console application. This will get and display the details of the currently signed in user:
// request 2 - current user
var requestMeUser = client.Me.Request();

var resultMe = requestMeUser.GetAsync().Result;
Console.WriteLine(resultMe.Id + ": " + resultMe.DisplayName + " <" + resultMe.Mail + ">");

Console.WriteLine("\nGraph Request:");
Console.WriteLine(requestMeUser.GetHttpRequestMessage().RequestUri);
Build and test the application
- Run the following command in a command prompt to compile and run the console application:
dotnet build
dotnet run
- After you’ve logged in, you’ll see the details of the signed in user written to the console.

Task 4: Display details of a specific user
In this last section, you’ll learn how to obtain a specific user’s details.
- Locate the code you added above for
// request 2 - current userand comment it out so it doesn’t continue to execute.
The first step is finding a specific user’s unique identifier in your organization. From the first example above, copy the Id of a user in your organization other than the one that is currently signed in.
- Add the following code to the
Mainmethod of the console application. This will obtain the details of a specific user:
// request 3 - specific user
var requestSpecificUser = client.Users[""].Request();
var resultOtherUser = requestSpecificUser.GetAsync().Result;
Console.WriteLine(resultOtherUser.Id + ": " + resultOtherUser.DisplayName + " <" + resultOtherUser.Mail + ">");

Console.WriteLine("\nGraph Request:");
Console.WriteLine(requestSpecificUser.GetHttpRequestMessage().RequestUri);
- Update the `` string with the
Idof an existing user you copied previously. Notice that this code will get a specific user by passing in theirIdinto theUserscollection.
Build and test the application
- Run the following command in a command prompt to compile and run the console application:
dotnet build
dotnet run
- After you’ve logged in, you’ll see the details of the user you selected.

Summary
In this exercise, you created an Azure AD application registration using the Azure Active Directory admin center, a .NET Core console application, and query Microsoft Graph for user data.